中安拓也のブログ

プログラミングについて書くブログ

【Flutter】ルーティングライブラリFluroの使い方

はじめに

FlutterのルーティングライブラリであるFluroの使い方について、簡単なTODOアプリの実装を通して説明していきます。

環境

本記事のサンプルアプリで使用しているライブラリのバージョンです。

  • flutter: 2.8.1
  • fluro: 2.0.3

インストール

$ flutter pub add fluro

Fluroの使い方

まずはFluroを使ったルーティングの設定方法から説明していきます。

ルーティングの初期設定

Flutterのエントリーポイントであるmain()メソッド内で、ルーティングの初期設定を行なっています。

lib/main.dart

import 'package:fluro/fluro.dart';
import 'package:flutter/material.dart';

import 'router/routes.dart';

void main() {
  // FluroRouterオブジェクトの初期化
  final router = FluroRouter();
  // ルーディングの設定
  Routes.configureRoutes(router);
  // 他のWidgetからも呼び出せるようにFluroRouterオブジェクトをrouterプロパティに設定
  TodoApp.router = router;

  runApp(const TodoApp());
}

class TodoApp extends StatelessWidget {
  static FluroRouter? router;

  const TodoApp({Key? key}) : super(key: key);

  @override
  Widget build(BuildContext context) {
    // 最初のrouteを「/」に設定
    // Fluroから提供されているgeneratorをonGenerateRouteに設定
    return MaterialApp(
        initialRoute: '/', onGenerateRoute: TodoApp.router?.generator);
  }
}

main()メソッド内では、Fluroを使ってルーティングをするために必要なFluroRouter()オブジェクトの定義と、routeと画面の紐付けをするために作成したメソッドであるRoutes.configureRoutesを呼び出しています。

また、WidgetツリーのルートであるTodoAppのstaticプロパティrouterに、FluroRouterオブジェクトを設定することで、他画面でもFluroルーターにアクセスできるようにします。

  // FluroRouterオブジェクトの初期化
  final router = FluroRouter();
  // ルーディングの設定
  Routes.configureRoutes(router);
  // 他のWidgetからも呼び出せるようにFluroRouterオブジェクトをrouterプロパティに設定
  TodoApp.router = router;

以下では、MaterialAppのコンストラクタでinitialRoute: '/'と定義することで最初に遷移するrouteを「/」に設定しています。

また、onGenerateRoute: TodoApp.router?.generatorと定義することでルーティング設定をFlutter側に渡しています。

    // 最初のrouteを「/」に設定
    // Fluroから提供されているgeneratorをonGenerateRouteに設定
    return MaterialApp(
        initialRoute: '/', onGenerateRoute: TodoApp.router?.generator);
  }

routeと遷移先画面の紐付け

main()メソッドから呼んでいるRoutes.configureRoutesメソッドでrouteと遷移先画面の紐付けをしていきます。

lib/router/routes.dart

import 'package:fluro/fluro.dart';
import 'package:flutter/material.dart';
import 'package:flutter_basic_todo/model/todo.dart';
import 'package:flutter_basic_todo/pages/account_page.dart';
import 'package:flutter_basic_todo/pages/add_todo_page.dart';
import 'package:flutter_basic_todo/pages/todo_detail_page.dart';
import 'package:flutter_basic_todo/pages/todo_list_page.dart';

// 遷移先に渡したい値がない時に使用するハンドラー
// 単に引数で設定した遷移先の画面を返すだけのハンドラーになっている
Handler createBasicHandler(Widget targetWidget) {
  return Handler(
      handlerFunc: (BuildContext? context, Map<String, List<String>> params) {
    return targetWidget;
  });
}

// アカウント画面に遷移する時に呼び出されるハンドラー
// パスに設定したuserNameパラメーターを遷移先の画面に渡している
Handler accountPageHandler = Handler(
    handlerFunc: (BuildContext? context, Map<String, List<String>> params) {
  return AccountPage(params['userName']!.first);
});

// TODO詳細画面に遷移する時に呼び出されるハンドラー
// Todoオブジェクトを遷移先の画面に渡している
Handler todoDetailPageHandler = Handler(
    handlerFunc: (BuildContext? context, Map<String, List<String>> params) {
  final args = context?.settings?.arguments as Todo;
  return TodoDetailPage(args);
});

class Routes {
  // routeと遷移先の画面、遷移時に呼び出されるハンドラーを設定している
  static void configureRoutes(FluroRouter router) {
    router
      // 最初に遷移する画面、route: '/'でTODOリスト画面に遷移する
      ..define('/', handler: createBasicHandler(const TodoListPage()))
      // route: '/add'でTODO追加画面に遷移するように設定している
      ..define('/add', handler: createBasicHandler(const AddTodoPage()))
      // route: '/account/:userName'でアカウント画面に遷移する
      // ':userName'パラメーターでユーザー名を遷移先の画面に渡している
      ..define('/account/:userName', handler: accountPageHandler)
      // route: '/detail'でTODO詳細画面に遷移する
      // Todoオブジェクトを遷移先の画面に渡している
      ..define('/detail', handler: todoDetailPageHandler);
  }
}

Fluroではルーティングの設定を、routeとハンドラー関数をマッピングする形式で実施します。 例えば、..define('/detail', handler: todoDetailPageHandler)では、画面遷移時に/detailがrouteとして指定された時には、ハンドラー関数としてtodoDetailPageHandlerを呼び出す、という感じです。

上記のRoutes.configureRoutesメソッドで実施しているルーディングの設定とそのルーティングを使った画面遷移の方法について詳しく説明していきます。

値を渡さない場合の画面遷移

まず、以下のルーディング設定では、route/addに合致した場合にハンドラーcreateBasicHandler(const AddTodoPage())を呼ぶ、という設定をしています。

createBasicHandler()では、引数として渡されたWidgetをそのまま返すという処理を行なっているため、route/addに合致するとTODO追加画面(AddTodoPage)に遷移します。

// 遷移先に渡したい値がない時に使用するハンドラー
// 単に引数で設定した遷移先の画面を返すだけのハンドラーになっている
Handler createBasicHandler(Widget targetWidget) {
  return Handler(
      handlerFunc: (BuildContext? context, Map<String, List<String>> params) {
    return targetWidget;
  });
}

class Routes {
  static void configureRoutes(FluroRouter router) {
    router
      // route: '/add'でTodo追加画面に遷移するように設定している
      ..define('/add', handler: createBasicHandler(const AddTodoPage()))
  }

上記のルーティング設定を使用して画面遷移を実施する場合は以下のようになります。

// TODO追加画面に遷移する
TodoApp.router?.navigateTo(context, '/add',
              transition: TransitionType.material);

上記のFluroのFluroRouter.navigateToメソッドはFlutterのNavigator.pushを拡張したものなので基本的な使い方はNavigator.pushと同じになります。

例えば、TODO追加画面から遷移元の画面に戻した値を受け取るときは、FlutterのNavigatorを使用した場合と同様に以下の書き方になります。

// TODO追加画面
// 遷移元の画面に値('send value')を渡す
TodoApp.router?.pop(context, 'send value');
// 遷移元の画面
// 遷移先から戻る時に渡された値('send value')を受けとる
final newListText = await TodoApp.router?.navigateTo(context, '/add',
              transition: TransitionType.material);

なお、遷移元の画面に戻る時に使用するFluroRouter.pop()は、裏側でFlutterのNavigator.pop()を呼んでいるだけなので、両者に違いはありません。

パラメーター付きrouteで遷移先画面に値を渡す
// アカウント画面に遷移する時に呼び出されるハンドラー
// パスに設定したuserNameパラメーターを遷移先の画面に渡している
Handler accountPageHandler = Handler(
    handlerFunc: (BuildContext? context, Map<String, List<String>> params) {
  return AccountPage(params['userName']!.first);
});

class Routes {
  static void configureRoutes(FluroRouter router) {
    router
      // route: '/account/:userName'でアカウント画面に遷移する
      // ':userName'パラメーターでユーザー名を遷移先の画面に渡している
      ..define('/account/:userName', handler: accountPageHandler)
  }
  }
}

上記のルーティング設定は、route/account/[渡したい値]に合致した場合にハンドラーaccountPageHandlerを呼び出して、アカウント画面(AccountPage)にrouteに含めたパラメーターを渡して遷移する、という設定になります。

上記のルーティング設定を使用して画面遷移を実施する場合は以下のようになります。

const accountName = '花籠総矢';
// アカウント画面に遷移する
TodoApp.router?.navigateTo(context, '/account/$accountName');

上記のように画面遷移することで、遷移先の画面に値'花籠総矢'を渡すことができます。

オブジェクトを遷移先の画面に渡す

パラメーター付きrouteを使う方法以外にも、BuildContext.settings.arguments経由で値を渡す方法もあります。

以下のルーティング設定では、route/detailに合致した場合にTodoオブジェクトをTODO詳細画面(TodoDetailPage)に渡す設定をしています。

// Todo詳細画面に遷移する時に呼び出されるハンドラー
// Todoオブジェクトを遷移先の画面に渡している
Handler todoDetailPageHandler = Handler(
    handlerFunc: (BuildContext? context, Map<String, List<String>> params) {
  final args = context?.settings?.arguments as Todo;
  return TodoDetailPage(args);
});

class Routes {
  static void configureRoutes(FluroRouter router) {
    router
      // route: '/detail'でTodo詳細画面に遷移する
      // Todoオブジェクトを遷移先の画面に渡している
      ..define('/detail', handler: todoDetailPageHandler);
  }

上記のルーティング設定を使用して画面遷移を実施する場合は以下のようになります。

          TodoApp.router?.navigateTo(
            context,
            '/detail',
            routeSettings: RouteSettings(
              arguments: Todo('todo-101', 'ゴミ出し'),
            ),
          );

上記の画面遷移では、遷移先の画面(TodoDetailPage)にTodo('todo-101', 'ゴミ出し')を渡しています。

参考サイト

fluro | Flutter Package

【Angular】useExistingで一つのサービスインスタンスに複数のDIトークンを紐づける

はじめに

あるDIトークンを別のDIトークンにマッピングすることができる、プロバイダーキーuseExistingについて説明します。

基本的なプロバイダー設定

useExistingについて触れる前に、基本的なプロバイダーの設定についておさらいしていきます。

下記のようにプロバイダーを設定すると、一件のSampleServiceインスタンスが作成され、DIトークンSampleServiceに関連づけられます。

@Injectable({
  providedIn: 'root',
})
export class SampleService {}

もしくは

providers: [SampleService]

なお、providers: [SampleService]は、[{ provide: SampleService, useClass: SampleService }]のシンタックスシュガーのため、どちらも同じ意味になります。

上記でプロバイダー設定されているSampleServieをコンポーネントやサービスクラスに注入するときは、以下のようにプロバイダーで指定されているDIトークンSampleServiceの型を使用する必要があります。

constructor(heroService: HeroService)

上記の記法で、SampleServieインスタンスを複数のDIトークン(SampleServiceBasicService)に紐づけようとすると下記のような書き方になると思います。

  providers: [
    SampleService,
    { provide: BasicService, useClass: SampleService },
  ],

また、上記で定義したサービスをコンポーネントやサービスに注入しようとすると下記のような書き方になります。

  constructor(
    private sampleService: SampleService,
    private basicService: BasicService
  ) {}

上記の書き方だと、確かにSampleServieインスタンスは複数のDIトークン(SampleServiceBasicService)に紐づきますが、その代わりSampleServieインスタンスが複数件(上記の例だと2件)作成されます。

シングルトンとして使用されることを意図したサービスのインスタンスを複数件作成してしまった場合、期待結果通りにシステムが動かなくなることがあります。*1

このように、一件のサービスインスタンスに複数のDIトークンを紐づけたい場合には、useExistingが役に立ちます。

useExistingについて

プロバイダーキーのuseExistingは、あるDIトークンを別のDIトークンにマッピングすることができるため、一つのサービスインスタンスに複数のDIトークンを紐づける、といった使い方ができます。

例えば、SampleServiceを2件のDIトークン(SampleServiceBasicService)に紐づける場合には、下記のような書き方ができます。

  providers: [
    SampleService,
    { provide: BasicService, useExisting: SampleService },
  ],

上記の書き方は、useClassを使った下記の書き方と同様の意味になります。

  providers: [
    { provide: SampleService, useClass: SampleService },
    { provide: BasicService, useExisting: SampleService },
  ],

上記のようにuseExistingを使用してプロバイダー設定を書くことで、SampleServiceのインスタンスを複数件作成せずに、SampleServiceのインスタンスを複数のDIトークンに紐づけることができます。

流れとしては、下記のようになります。

  1. { provide: SampleService, useClass: SampleService }により、SampleServiceのインスタンスが1件作成されたあと、DIトークンSampleServiceに割り当てられる

  2. useExistingを使うことでDIトークンSampleServiceをDIトークンBasicServiceにマッピングする

  3. 結果として、2件のDIトークン(SampleServiceBasicService)が同じ1件のSampleServiceインスタンスに関連付けられる

使用例

useExistingの具体的な使用例として、カスタムエラーハンドラーを直接呼び出す時に使ったりします。

カスタムエラーハンドラーを直接呼び出す

Angularでカスタムエラーハンドラーを定義するには、以下のような設定をする必要があります。

@Injectable()
export class SampleErrorHandler implements ErrorHandler {
  public handleError(error: any): void {
    console.error(error);
  }

  public openErrorWindow(): void {
    window.alert('エラーが発生しました');
  }
}

@NgModule({
  providers: [{ provide: ErrorHandler, useClass: SampleErrorHandler }]
})
class SampleModule {}

この状態でカスタムエラーハンドラーSampleErrorHandlerのメソッドopenErrorWindow()を下記のようにコンポーネントから呼び出そうとするとNullInjectorErrorエラーで失敗します。

export class SampleComponent {
  constructor(private sampleErrorHandler: SampleErrorHandler) {
    this.sampleErrorHandler.openErrorWindow();
  }
}

発生するエラー

NullInjectorError: R3InjectorError(SampleModule)[SampleErrorHandler -> SampleErrorHandler -> SampleErrorHandler]: 
  NullInjectorError: No provider for SampleErrorHandler!

上記のようにNullInjectorErrorが発生するのは、SampleErrorHandlerインスタンスがDIトークンErrorHandlerにしか関連付けられていないのに、コンポーネントのSampleComponentでDIトークンSampleErrorHandlerからSampleErrorHandlerインスタンスを参照しようとしているのが原因です。

ここで、useExistingを使って下記のように設定すると、エラーを発生させずにカスタムエラーハンドラーのメソッドを直接呼ぶことができるようになります。

@Injectable()
export class SampleErrorHandler implements ErrorHandler {
  public handleError(error: any): void {
    console.error(error);
  }

  public openErrorWindow(): void {
    window.alert('エラーが発生しました');
  }
}

@NgModule({
  providers: [
    { provide: ErrorHandler, useClass: SampleErrorHandler },
    { provide: SampleErrorHandler, useExisting: ErrorHandler },
  ],
})
class SampleModule {}

@Component({
  selector: 'sample-root',
  templateUrl: './sample.component.html',
  styleUrls: ['./sample.component.scss'],
})
export class SampleComponent {
  constructor(private sampleErrorHandler: SampleErrorHandler) {
    this.sampleErrorHandler.openErrorWindow();
  }
}

上記では、useExistingにより、カスタムエラーハンドラーSampleErrorHandlerのインスタンスが2件のDIトークン(ErrorHandlerSampleErrorHandler)に紐づけられることで、コンポーネントSampleComponentからカスタムエラーハンドラーのopenErrorWindow()メソッドを呼び出すことができるようになっています。

参考サイト

https://angular.jp/guide/dependency-injection-in-action

https://angular.jp/guide/singleton-services

*1:サービスが持っているプロパティが期待結果通り更新されないなどの意図しない動作が発生する可能性がある

【Cordova】[Android] APK/AABのファイル名を変更する

はじめに

Androidビルド時に作成されるAPK(Android Application Package)とAAB(Android App Bundle)のファイル名を変更する方法について説明していきます。

APK/AABファイルの名称変更の方法のうち、ビルドタイプ/プロダクトフレーバーも含めて変更する方法と、ビルドタイプ/プロダクトフレーバーについては変更しない方法がありますが、今回は前者について説明します。

環境

今回の記事では、IonicCordova/Angular)で作成したAPK/AABファイルの名称を変更しています。

ionic infoコマンドの実行結果

% ionic info

Ionic:

   Ionic CLI                     : 6.17.1 (/usr/local/lib/node_modules/@ionic/cli)
   Ionic Framework               : @ionic/angular 5.7.0
   @angular-devkit/build-angular : 12.1.4
   @angular-devkit/schematics    : 12.2.6
   @angular/cli                  : 12.1.4
   @ionic/angular-toolkit        : 4.0.0

Cordova:

   Cordova CLI       : 10.0.0
   Cordova Platforms : android 9.1.0
   Cordova Plugins   : cordova-plugin-ionic-keyboard 2.2.0, cordova-plugin-ionic-webview 4.2.1, (and 4 other plugins)

Utility:

   cordova-res : not installed globally
   native-run  : not installed globally

System:

   NodeJS : v14.17.6 (/usr/local/bin/node)
   npm    : 6.14.15
   OS     : macOS Big Sur
   Xcode  : Xcode 12.5.1 Build version 12E507

デフォルトのファイル名

ファイル名について何も設定をしていない状態では、どのような命名規則でファイル名が設定されるのかをまず確認していきます。

Android Application Package(.apk)の場合

Ionic(Cordova)では、以下のコマンドで.apkファイルを作成することができます。

ionic cordova build android

上記のコマンドの結果、[ionicプロジェクト]/platforms/android/app/build/outputs/apk/debug配下にapp-debug.apkファイルが作成されます。

f:id:l08084:20210918163454p:plain
app-debug.apkファイルが作成される

このように、デフォルトでは.apkファイルは以下のような命名規則でファイルが命名されます。

app-[プロダクトフレーバー]-[ビルドタイプ].apk

今回は、ビルドタイプをdebugに設定しプロダクトフレーバーは作成していないため、ファイル名がapp-debug.apkになっています。

Android App Bundle(.aab)の場合

Ionic(Cordova)では、以下のコマンドで.aabファイルを作成することができます。

ionic cordova build android -- -- --packageType=bundle

上記のコマンドの結果、[ionicプロジェクト]/platforms/android/app/build/outputs/bundle/debug配下にapp-debug.aabファイルが作成されます。

f:id:l08084:20210918170602p:plain
app-debug.aabファイルが作成される

.aabファイルの命名規則も、拡張子(.aab)以外は.apkファイルと同じになります。1

app-[プロダクトフレーバー]-[ビルドタイプ].aab

ファイル名の変更方法

APK/AABファイルをそれぞれ以下の通り、名称を変更することで、ファイル名の変更方法について説明します。

  • APKファイル
    • 変更前: app-debug.apk
    • 変更後: android-application-package.apk
  • AABファイル
    • 変更前: app-debug.aab
    • 変更後: android-app-bundle.aab

APK/AABのファイル名を変更する方法についてですが、Cordova のフックスクリプトで直接ファイル名を変更する方法などもありますが、今回はGradle経由で変更する方法について説明します。

Gradle経由でファイル名を変更する

それでは、Gradle経由でAPK/AABのファイル名を変更する方法について説明していきます。

Gradleでファイル名を変更する大まかな流れですが、以下になります。

  1. before_buildにフックされたCordovaフックスクリプト(JavaScript)がビルド前のタイミングでコールされる

  2. コールされたCordovaフックスクリプトがbuild-extras.gradleファイルを[ionicプロジェクト]/platforms/android/appディレクトリ配下にコピーする

  3. ファイル名を変更する処理が設定されたbuild-extras.gradleappディレクトリ配下に配置されることにより、AndroidビルドのタイミングでAPK/AABのファイル名が変更される

ビルドの設定ファイルであるbuild.gradleはAndroidビルド後に作成されるため、ビルドの設定を拡張するためには上記のようにフックスクリプトを経由する必要があります。

build-extras.gradleをコピーするCordovaフックスクリプトを作成する

APK/AABファイルの両方で使用する、build-extras.gradleをコピーするCordovaフックスクリプトを作成します。

build_scripts/copy-build-extras.js

/*
 * customize build.gradle
 */
const fs = require("fs");
const path = require("path");

const androidAppFolderPath = ["platforms", "android", "app"];
const extrasGradleFilePath = ["build_scripts", "build_extras"];
const extrasGradleFileName = "build-extras.gradle";

const copyBuildExtras = (
  androidAppFolderFullPath,
  extrasGradleFileFullPath,
  destinationFullPath
) => {
  if (
    !fs.existsSync(
      androidAppFolderFullPath || !fs.existsSync(extrasGradleFileFullPath)
    )
  ) {
    console.log(`${extrasGradleFileFullPath} not found. Skipping`)
    return;
  }
  fs.copyFile(extrasGradleFileFullPath, destinationFullPath, (err) => {
    if (err) {
      console.error(err);
      return;
    }
    console.log('copied build-extras.gradle');
  })
};

module.exports = (context) => {
  copyBuildExtras(
    path.join(context.opts.projectRoot, ...androidAppFolderPath),
    path.join(
      context.opts.projectRoot,
      ...extrasGradleFilePath,
      extrasGradleFileName
    ),
    path.join(context.opts.projectRoot, ...androidAppFolderPath, extrasGradleFileName)
  );
};

続いて、上記で作成したCordovaフックスクリプトをビルド前(before_build)に呼び出されるようにフックします。

config.xml

<?xml version='1.0' encoding='utf-8'?>
<widget id="io.ionic.starter" version="0.0.1" xmlns="http://www.w3.org/ns/widgets" xmlns:cdv="http://cordova.apache.org/ns/1.0">
    ...
    <platform name="android">
        ...
        <hook src="build_scripts/copy-build-extras.js" type="before_build" />
    ...
    </platform>
    <platform name="ios">
    ...
    </platform>
</widget>

これでCordovaフックスクリプトの作成とフックの設定が完了したので、続いてAPKとAABのファイル名を変更するbuild-extras.gradleを作成していきます。

APKファイルの名称を変更する

以下がAPKファイルの名称を変更するbuild-extras.gradleになります。

build_scripts/build_extras/build-extras.gradle

android {
    applicationVariants.all { variant ->
        if (variant.buildType.name != "debug") {
            return
        }
        variant.outputs.all {
            outputFileName = "android-application-package.apk"
        }
    }
}

AABファイルの名称を変更する

以下がAABファイルの名称を変更するbuild-extras.gradleになります。

build_scripts/build_extras/build-extras.gradle

android {
    task finalizeBundleDebug(type: Sync) {
        def path = "${buildDir}/outputs/bundle/debug/"
        from(path)
        include 'app-debug.aab'
        destinationDir file(path)
        rename 'app-debug.aab', 'android-app-bundle.aab'
    }
    tasks.whenTaskAdded { task ->
        if (task.name.equals('bundleDebug')) {
            task.finalizedBy finalizeBundleDebug
        }
    }
}

動作確認

フックスクリプトとbuild-extras.gradleの作成が終わったところで、APK/AABファイルの名称が変更されるか確認してみます。

APKファイル

以下のコマンドで.apkファイルを作成します。

ionic cordova build android

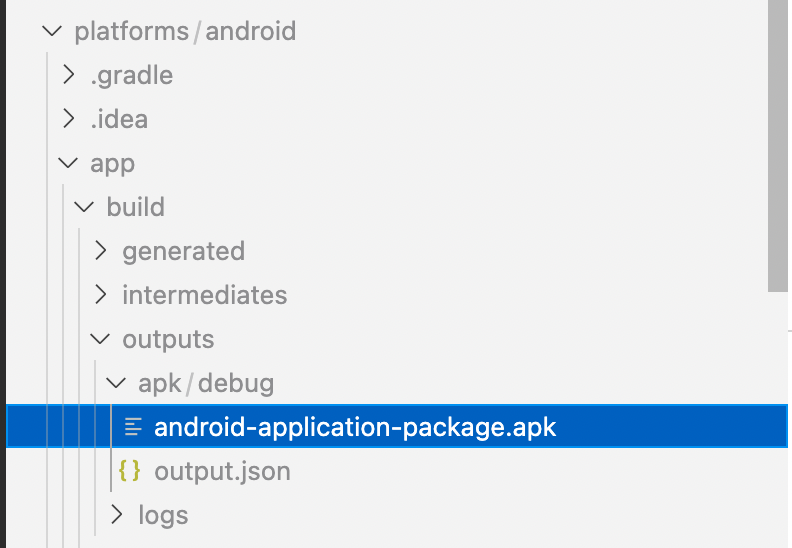
以下画像のようにファイル名が期待通り変更されています。

f:id:l08084:20210920182900p:plain
APKファイルの名称が変更されている

f:id:l08084:20210920182954p:plain
APKファイルの名称が変更されている

AABファイル

以下のコマンドで.aabファイルを作成します。

ionic cordova build android -- -- --packageType=bundle

.aabファイルも期待通り変更されていることがわかります。

f:id:l08084:20210920183329p:plain
AABファイルの名称が変更されている

f:id:l08084:20210920183411p:plain
AABファイルの名称が変更されている

参考サイト

Android Platform Guide - Apache Cordova

How do I add a version specific filename to a Cordova .apk - Stack Overflow

Copy build-extras to platforms/android · GitHub

ビルド時に生成されるAPK/AABのファイル名を変更する方法 - Qiita

ビルド バリアントを設定する  |  Android デベロッパー  |  Android Developers

How to make use of Android App Bundle in Ionic Applications? - Stack Overflow

Androidのビルドバリアントをイチから理解する | フューチャー技術ブログ

How to change the generated filename for App Bundles with Gradle?

Copy build-extras to platforms/android · GitHub


  1. Android Gradle プラグインの3.5.0 alpha 04以前では、Android App Bundleのデフォルトのファイル名にはビルドタイプもプロダクトフレーバーも含まれていなかった。Android Gradle プラグイン 3.5.0 alpha 04以前のAABファイルのデフォルトのファイル名はapp.aabとなる

【ESLint】Angularのファイル名の命名規則をチェックするESLintのカスタムルールを作成した

はじめに

Angularプロジェクトで作成したファイル名Angularコーディングスタイルガイドに沿っているかチェックするESLintのカスタムルール『eslint-plugin-angular-file-naming』を作成してnpmパッケージとして公開しました。

  • GitHubリポジトリ

github.com

  • npmパッケージ

www.npmjs.com

eslint-plugin-angular-file-namingの概要

eslint-plugin-angular-file-namingでは、5件のESLintのカスタムルールを提供していて、それぞれのルールでAngularのファイルタイプ(Component, Directive, Module, Pipe, Service)に適したsuffix(.component.ts, .directive.ts, .module.ts, .pipe.ts, .service.ts...)がファイル名に設定されているかを確認します。

また、suffixについてはデフォルトで設定されている値(.component.ts, .directive.ts, .module.ts, .pipe.ts, .service.ts...)とは別にオプションでsuffixの値を設定することもできます。

使用例

例えば、以下のように.eslintrcを設定した場合は、

// .eslintrc.json
module.exports = {
  "plugins": [
    ...,
    "angular-file-naming"
  ],
  "rules": [
    ...,
    "angular-file-naming/component-filename-suffix": [
      "error",
      {
        "suffixes": ["component", "page", "view"]
      }
    ],
    "angular-file-naming/directive-filename-suffix": "error",
    "angular-file-naming/module-filename-suffix": "error",
    "angular-file-naming/pipe-filename-suffix": "error",
    "angular-file-naming/service-filename-suffix": [
      "error",
      {
        "suffixes": ["service", "guard", "store"]
      }
    ],
  ]
  ...,
}

以下のファイル名が誤ったファイル名になり、

app.comp.ts
sample.ts
test.filter.ts

以下のファイル名が正しいファイル名になります。

app.component.ts
app.page.ts
app.view.ts
test.directive.ts
app.module.ts
sample.pipe.ts
test.service.ts
test.guard.ts
test.store.ts

f:id:l08084:20210724171604p:plain
誤ったファイル名を設定している場合、Lintエラーメッセージが表示される

環境

以下のバージョンのライブラリを使用して、ESLintのカスタムルールのnpmパッケージを作成しました。

  • eslint v7.28.0
  • typescript v4.3.2
  • jest v27.0.4

Angular v12のプロジェクトで動作確認をしています。

実装

eslint-plugin-angular-file-namingのカスタムルールの一つ、component-filename-suffixの実装内容について説明していきます。

カスタムルールのコード

component-filename-suffixは、@Componentデコレーターを持つクラスのファイル名のsuffixが.component.ts(もしくはオプションで設定したsuffix)に設定されているかをチェックするルールになります。

以下2件のソースコードのうち、src/rules/component-filename-suffix.tscomponent-filename-suffixのソースコード、src/utils/utils.tsは、component-filename-suffixが参照しているユーティリティになります。

src/rules/component-filename-suffix.ts

import { TSESLint, TSESTree } from '@typescript-eslint/experimental-utils';
import {
  COMPONENT_CLASS_DECORATOR,
  getFilenameSuffix,
  STYLE_GUIDE_LINK,
} from '../utils/utils';

type Options = { suffixes: string[] };

export const componentFilenameSuffix: TSESLint.RuleModule<
  'componentFilenameSuffix',
  [Options]
> = {
  meta: {
    type: 'suggestion',
    docs: {
      category: 'Best Practices',
      description: `The file name of Classes decorated with @Component must have suffix "component" (or custom) in their name. See more at ${STYLE_GUIDE_LINK}`,
      recommended: 'error',
      url: 'https://github.com/l08084/eslint-plugin-angular-file-naming/blob/main/docs/rules/component-filename-suffix.md',
    },
    messages: {
      componentFilenameSuffix: `The file name of component class should end with one of these suffixes: {{suffixes}} (${STYLE_GUIDE_LINK})`,
    },
    schema: [
      {
        type: 'object',
        properties: {
          suffixes: {
            type: 'array',
            items: {
              type: 'string',
            },
          },
        },
        additionalProperties: false,
      },
    ],
  },
  create: (context) => {
    return {
      [COMPONENT_CLASS_DECORATOR](node: TSESTree.Decorator) {
        const filename = context.getFilename();
        const suffixes = context.options[0]?.suffixes || ['component'];
        const filenameSuffix = getFilenameSuffix(filename);
        if (
          !filenameSuffix ||
          !(filenameSuffix.length > 1) ||
          !suffixes.find((suffix) => suffix === filenameSuffix[1])
        ) {
          context.report({
            node,
            messageId: 'componentFilenameSuffix',
            data: { suffixes },
          });
        }
      },
    };
  },
};

module.exports = componentFilenameSuffix;
export default componentFilenameSuffix;

src/utils/utils.ts

export const STYLE_GUIDE_LINK =
  'https://angular.io/guide/styleguide#style-02-03';

export const COMPONENT_CLASS_DECORATOR =
  'ClassDeclaration > Decorator[expression.callee.name="Component"]';

export const DIRECTIVE_CLASS_DECORATOR =
  'ClassDeclaration > Decorator[expression.callee.name="Directive"]';

export const PIPE_CLASS_DECORATOR =
  'ClassDeclaration > Decorator[expression.callee.name="Pipe"]';

export const MODULE_CLASS_DECORATOR =
  'ClassDeclaration > Decorator[expression.callee.name="NgModule"]';

export const INJECTABLE_CLASS_DECORATOR =
  'ClassDeclaration > Decorator[expression.callee.name="Injectable"]';

/**
 * get filename suffix
 *
 * @export
 * @param {string} filename
 * @returns {(RegExpMatchArray | null)}
 */
export function getFilenameSuffix(filename: string): RegExpMatchArray | null {
  return filename.match(/(?:\/|\\).+\.(.+)\.ts$/);
}

ソースコードに@Componentデコレーターが含まれているかどうかのチェックは、ESLintのSelector機能を使用しています。

export const COMPONENT_CLASS_DECORATOR =
  'ClassDeclaration > Decorator[expression.callee.name="Component"]';

ファイル名のsuffixの抽出は、正規表現のグループ機能を使用しています。

return filename.match(/(?:\/|\\).+\.(.+)\.ts$/);

テストコード

component-filename-suffixのテストコードです。

テスティングフレームワークとして、Jestを使用しています。

tests/rules/component-filename-suffix.test.ts

import { TSESLint } from '@typescript-eslint/experimental-utils';
import componentFilenameSuffix from '../../src/rules/component-filename-suffix';

const tester = new TSESLint.RuleTester({
  parser: require.resolve('@typescript-eslint/parser'),
});

tester.run('componentFilenameSuffix', componentFilenameSuffix, {
  valid: [
    {
      code: `
        @Component({
      selector: 'sg-foo-bar',
      templateUrl: './test.component.html',
    })
    class TestComponent {}
  `,
      filename: '/src/app/test.component.ts',
    },
    {
      code: `
        @Component({
      selector: 'sg-foo-bar',
      templateUrl: './test.component.html',
    })
    class TestComponent {}
  `,
      filename: '/src/app/test.component.ts',
      options: [{ suffixes: ['component', 'page'] }],
    },
    {
      code: `
        @Component({
      selector: 'sg-foo-bar',
      templateUrl: './test.page.html',
    })
    class TestComponent {}
  `,
      filename: '/src/app/test.page.ts',
      options: [{ suffixes: ['component', 'page'] }],
    },
    {
      code: `
        @Component({
      selector: 'sg-foo-bar',
      templateUrl: './test.page.html',
    })
    class TestPage {}
  `,
      filename: '/src/app/test.page.ts',
      options: [{ suffixes: ['page'] }],
    },
    {
      code: `
    @Directive({
      selector: '[myHighlight]'
    })
    class TestDirective {}
  `,
      filename: '/src/app/test.directive.ts',
      options: [{ suffixes: ['page'] }],
    },
  ],
  invalid: [
    {
      code: `
        @Component({
      selector: 'sg-foo-bar',
      templateUrl: './test.component.html',
    })
    class TestComponent {}
  `,
      filename: '/src/app/test.components.ts',
      errors: [{ messageId: 'componentFilenameSuffix' }],
    },
    {
      code: `
        @Component({
      selector: 'sg-foo-bar',
      templateUrl: './test.view.html',
    })
    class TestView {}
  `,
      filename: '/src/app/test.view.ts',
      options: [{ suffixes: ['component', 'page'] }],
      errors: [{ messageId: 'componentFilenameSuffix' }],
    },
    {
      code: `
        @Component({
      selector: 'sg-foo-bar',
      templateUrl: './test.component.html',
    })
    class TestComponent {}
  `,
      filename: '/src/app/test.component.ts',
      options: [{ suffixes: ['view', 'page'] }],
      errors: [{ messageId: 'componentFilenameSuffix' }],
    },
  ],
});

参考サイト

How can I enforce filename and folder name convention in typescript eslint? - Stack Overflow

eslint-plugin-unicorn/filename-case.md at main · sindresorhus/eslint-plugin-unicorn · GitHub

Angular: ESLintサポートの現状 2020 Autumn | lacolaco/tech

Selectors - ESLint - Pluggable JavaScript linter

【ESLint】Angularのテンプレート(HTML)をチェックするESLintのカスタムルールを作成する

はじめに

JavaScriptやTypeScriptではなく、HTMLをチェックするESLintのカスタムルールを作成します。

具体的には、Ionic(Angular)のHTMLファイルで、(click)を使用するときに、Ionicのtappable属性が設定されているかチェックするESLintのカスタムルールeslint-plugin-ionic-tappableを作成して、npmパッケージとして公開します。

  • 作成したESLintプラグインのリポジトリ

github.com

  • 公開したnpmパッケージ

www.npmjs.com

tappable属性とは?

Ionicでは、クリッカブルな要素 (<button><a>)以外の要素でクリックイベント((click))を使用する場合は、要素をクリックしてイベントが発火するまでに、300msの遅延が発生する可能性があります。 このような遅延を防ぐためには、 tappable属性を設定してあげる必要があります。

悪いコードの例:

<!-- tappableがないから遅延してしまう -->
 <div (click)="doClick()">I am clickable!</div>

良いコードの例:

<!-- tappableがあるから遅延しない -->
 <div tappable (click)="doClick()">I am clickable!</div>

<!-- クリッカブルな要素だから、tappableがなくても遅延しない -->
 <button (click)="doClick()">I am clickable!</button>

環境

以下のバージョンのライブラリを使用して、ESLintのカスタムルールのnpmパッケージを作成しました。

  • eslint v7.28.0
  • typescript v4.3.2
  • jest v27.0.4

実装

HTMLをチェックするESLintのカスタムルールをTypeScriptで作成して、npmパッケージとして公開していきます。

package.json作成

まず、package.jsonから作成していきます。

  • package.json
{
  "name": "eslint-plugin-ionic-tappable",
  "version": "1.0.1",
  "description": "ESLint plugin for Ionic tappable attribute",
  "author": {
    "name": "Takuya Nakayasu",
    "email": "l08084.1989@gmail.com",
    "url": "https://github.com/l08084"
  },
  "repository": {
    "type": "git",
    "url": "git+https://github.com/l08084/eslint-plugin-ionic-tappable.git"
  },
  "homepage": "https://github.com/l08084/eslint-plugin-ionic-tappable",
  "license": "MIT",
  "keywords": [
    "eslint",
    "ionic",
    "eslintplugin",
    "eslint-plugin"
  ],
  "main": "dist/index.js",
  "scripts": {
    "build": "tsc",
    "clean": "rimraf dist",
    "lint": "npx eslint . --ext .ts",
    "test": "jest",
    "test-sample": "eslint src/samples/sample.ts",
    "prepublishOnly": "npm run clean && npm run build"
  },
  "devDependencies": {
    "@angular-eslint/template-parser": "12.2.0",
    "@types/jest": "26.0.23",
    "@typescript-eslint/eslint-plugin": "4.26.0",
    "@typescript-eslint/experimental-utils": "4.25.0",
    "@typescript-eslint/parser": "4.26.0",
    "eslint": "7.28.0",
    "jest": "27.0.4",
    "prettier": "2.3.0",
    "rimraf": "3.0.2",
    "ts-jest": "27.0.2",
    "typescript": "4.3.2"
  }
}

インストールしているnpmパッケージについて説明します。

  • @typescript-eslint/experimental-utils
    • ESLintのカスタムルールをTypeScriptで書くときに型などをサポートしてくれるライブラリ
  • @types/jest, jest, ts-jest
    • テスティングフレームワークのJest関連のライブラリ。作成したカスタムルールのテストに使用する

tsconfig.json

JavaScriptではなくTypeScriptでESLintプラグインを作成したいのでtsconfig.jsonを作成します。

  • tsconfig.json
{
  "compilerOptions": {
    "target": "es5",
    "module": "commonjs",
    "strict": true,
    "outDir": "./dist",
    "esModuleInterop": true,
    "skipLibCheck": true,
    "forceConsistentCasingInFileNames": true
  },
  "include": ["src/**/*"],
  "exclude": ["src/samples/*"]
}

テストコード

設定ファイルを作成したので、続いてテストコードを書いていきます。

テスティングフレームワークには、使用している@typescript-eslint/experimental-utilsライブラリが採用している関係でJestを使用します。

まずJestの設定ファイルから作成します。

jest.config.js

module.exports = {
  transform: {
    '^.+\\.ts$': 'ts-jest',
  },
};

続いて、Jestでテストコードを書いていきます。clickEventsHaveTappableはこれから作成するESLintプラグインのカスタムルールになります。なお、clickEventsHaveTappableのメッセージIDもclickEventsHaveTappableです。

tests/rules/click-events-have-tappable.test.ts

import { TSESLint } from '@typescript-eslint/experimental-utils';
import clickEventsHaveTappable from '../../src/rules/click-events-have-tappable';

const tester = new TSESLint.RuleTester({
  parser: require.resolve('@angular-eslint/template-parser'),
});

tester.run('clickEventsHaveTappable', clickEventsHaveTappable, {
  valid: [
    { code: `<h1>Heading Content!</h1>` },
    {
      code: `<div tappable (click)="doClick()">I am clickable!</div>`,
    },
    {
      code: `<div appHighlight tappable (click)="doClick()">I am clickable!</div>`,
    },
    { code: `<button (click)="doClick()">I am clickable!</button>` },
    { code: `<ion-button (click)="doClick()">I am clickable!</ion-button>` },
    { code: `<a (click)="doClick()">I am clickable!</a>` },
    {
      code: `
    <a
    aria-label="Angular on YouTube"
    target="_blank"
    rel="noopener"
    href="https://youtube.com/angular"
    title="YouTube"
  >
    <svg
      id="youtube-logo"
      height="24"
      width="24"
      fill="#fff"
    >
      <path d="M0 0h24v24H0V0z" fill="none" />
    </svg>
  </a>
  `,
    },
    {
      code: `
    <a
    (click)="doClick()"
    target="_blank"
    rel="noopener"
    href="https://youtube.com/angular"
    title="YouTube"
  >
    <svg
      id="youtube-logo"
      height="24"
      width="24"
      fill="#fff"
    >
      <path d="M0 0h24v24H0V0z" fill="none" />
    </svg>
  </a>
  `,
    },
  ],
  invalid: [
    {
      code: `<div (click)="doClick()">I am clickable!</div>`,
      errors: [{ messageId: 'clickEventsHaveTappable' }],
    },
    {
      code: `<span appHighlight (click)="doClick()">I am clickable!</span>`,
      errors: [{ messageId: 'clickEventsHaveTappable' }],
    },
  ],
});

リントエラーを出したくないコード(Angularのテンプレート)はvalid: []に、リントエラーがでて欲しいコードは、invalid: []に設定します。

今回のリントの対象はAngularのテンプレート(HTML)なので@angular-eslint/template-parserをパーサーとして使用しています。

ESLintカスタムルール作成

テストコードを作成したので本丸のESLintのカスタムルール作成していきます。

ESLintは、文字列データであるソースコードを抽象構文木(AST) にしてから解析するライブラリであるため、まずLint対象のソースコードがどのようなASTに変換されるのかを確認する必要があります。

以下のようなコードが@angular-eslint/template-parserパーサーだとどのようなASTに変換されるか確認します。

<div tappable (click)="doClick()">I am clickable!</div>

ATSに変換されると下記のようになります(一部略)。該当のコードはASTに変換されるとElementタイプになることがわかります。ちなみにESLintのカスタムルールにconsole.logを仕込む方法でAST変換をしています。

Element {
    name: 'div',
    attributes: [
      TextAttribute {
        name: 'tappable',
        value: '',
        sourceSpan: [ParseSourceSpan],
        keySpan: [ParseSourceSpan],
        valueSpan: undefined,
        i18n: undefined,
        type: 'TextAttribute',
        parent: [Circular *1]
      }
    ],
    inputs: [],
    outputs: [
      BoundEvent {
        name: 'click',
        type: 'BoundEvent',
        handler: [ASTWithSource],
        target: null,
        phase: null,
        sourceSpan: [ParseSourceSpan],
        handlerSpan: [ParseSourceSpan],
        keySpan: [ParseSourceSpan],
        __originalType: 0,
        parent: [Circular *1]
      }
    ],
    children: [
      Text {
        value: 'I am clickable!',
        sourceSpan: [ParseSourceSpan],
        type: 'Text',
        parent: [Circular *1]
      }
    ],
      sourceSpan: ParseSourceSpan {
        start: ParseLocation {
          file: [ParseSourceFile],
          offset: 0,
          line: 0,
          col: 0
        },
        end: ParseLocation {
          file: [ParseSourceFile],
          offset: 55,
          line: 0,
          col: 55
        },
        fullStart: ParseLocation {
          file: [ParseSourceFile],
          offset: 0,
          line: 0,
          col: 0
        },
        details: null
      },
    type: 'Element',
    parent: {
      type: 'Program',
      comments: [],
      tokens: [],
      range: [ 0, 55 ],
      loc: { start: [Object], end: [Object] },
      templateNodes: [ [Circular *1] ],
      value: '<div tappable (click)="doClick()">I am clickable!</div>',
      parent: null
    }
  }

Angularテンプレート(HTML)のASTのイメージが大体わかったので、カスタムルールのコードを書きます。

src/rules/click-events-have-tappable.ts

import type { TmplAstElement, ParseSourceSpan } from '@angular/compiler';

import { TSESLint, TSESTree } from '@typescript-eslint/experimental-utils';

function convertNodeSourceSpanToLoc(
  sourceSpan: ParseSourceSpan
): TSESTree.SourceLocation {
  return {
    start: {
      line: sourceSpan.start.line + 1,
      column: sourceSpan.start.col,
    },
    end: {
      line: sourceSpan.end.line + 1,
      column: sourceSpan.end.col,
    },
  };
}

export const clickEventsHaveTappable: TSESLint.RuleModule<
  'clickEventsHaveTappable',
  []
> = {
  meta: {
    type: 'suggestion',
    docs: {
      category: 'Best Practices',
      description:
        'Ensures that the click event is accompanied by `tappable`, except for `<button>`, `<ion-button>` and `<a>`.',
      recommended: 'warn',
      url: 'https://github.com/l08084/eslint-plugin-ionic-tappable/blob/main/docs/rules/click-events-have-tappable.md',
    },
    messages: {
      clickEventsHaveTappable:
        'click must be accompanied by `tappable`, except for `<button>`, `<ion-button>` and `<a>`.',
    },
    schema: [],
  },
  create: (context) => {
    return {
      Element(node: TmplAstElement) {
        const name = node.name;
        // <ion-button> or <button> or <a> の要素の場合は処理を中断する
        if (name === 'ion-button' || name === 'button' || name === 'a') {
          return;
        }

        const haveClickEvent = node.outputs.find(
          (output) => output.name === 'click'
        );
        // (click)を持っていない要素の場合は中断する
        if (!haveClickEvent) {
          return;
        }

        const haveTappable = node.attributes.find(
          (attribute) => attribute.name === 'tappable'
        );
        if (!haveTappable) {
          // Angularテンプレートのパーサーを使用している場合は、locを作成してあげる必要がある
          const loc = convertNodeSourceSpanToLoc(node.sourceSpan);
          context.report({ loc, messageId: 'clickEventsHaveTappable' });
        }
      },
    };
  },
};

module.exports = clickEventsHaveTappable;
export default clickEventsHaveTappable;

index.ts作成

最後に、ESLintプラグインとして外部から参照できるように、index.tsを作成します。

src/index.ts

import clickEventsHaveTappable from './rules/click-events-have-tappable';

export = {
  rules: {
    'click-events-have-tappable': clickEventsHaveTappable,
  },
  configs: {
    all: {
      parser: '@angular-eslint/template-parser',
      plugins: ['ionic-tappable'],
      rules: {
        'ionic-tappable/click-events-have-tappable': 'warn',
      },
    },
    recommended: {
      parser: '@angular-eslint/template-parser',
      plugins: ['ionic-tappable'],
      rules: {
        'ionic-tappable/click-events-have-tappable': 'warn',
      },
    },
  },
};

作成したルールclick-events-have-tappableを公開するだけでなく、ESLintの設定、eslint:alleslint:recommendedも公開しています。

npmパッケージ公開

ESLintプラグインの作成が完了したので、npmパッケージとして公開します。

npm version major
npm publish
  • 公開したnpmパッケージ

www.npmjs.com

動作確認

作成したESLintプラグインを実際にAngular v12のプロジェクトで動かしてみます。

作成したESLintプラグインをAngularプロジェクトにインストールして、

$ npm install --save-dev eslint-plugin-ionic-tappable

AngularプロジェクトのESLintの設定ファイルを以下のように修正します。

.eslintrc.json

{
  "root": true,
  ...
  "overrides": [
    ...
    {
      "files": ["*.html"],
      "parser": "@angular-eslint/template-parser",
      "plugins": ["ionic-tappable"],
      "rules": { "ionic-tappable/click-events-have-tappable": "warn" }
    }
  ]
}

この状態でESLintを実行すると、以下画像の通りリントチェックのメッセージが表示されます。

$ npx eslint ./src/app/app.component.html

f:id:l08084:20210704215838p:plain
作成したESLintプラグインのリントチェックが正常に動作していることがわかる

参考サイト

ランタイムの問題 - Ionic Framework 日本語ドキュメンテーション

angular-eslint/click-events-have-key-events.ts at master · angular-eslint/angular-eslint · GitHub

angular-eslint/convert-source-span-to-loc.ts at a4beae803e48197b9897eb9a9742186dc18aa4b5 · angular-eslint/angular-eslint · GitHub

【TypeScript】npmパッケージでコンパイル後のJSファイルをgit管理の対象外にする

はじめに

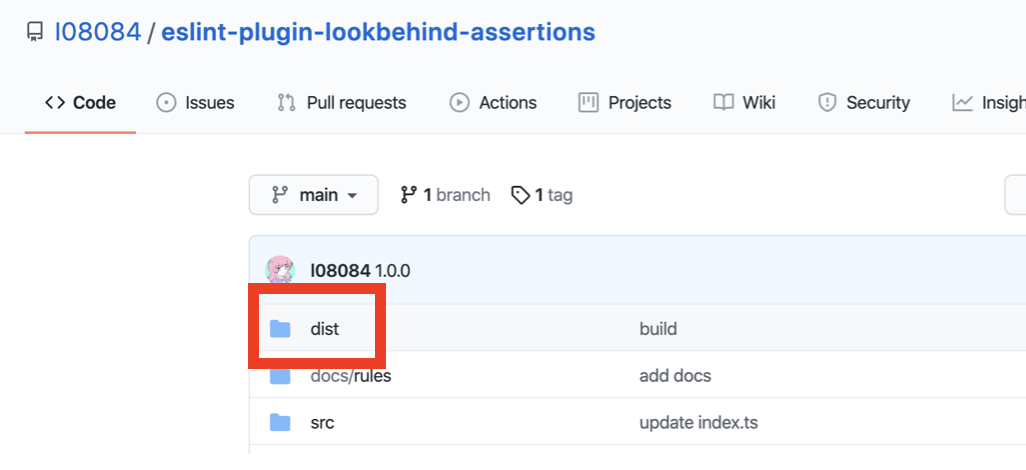
f:id:l08084:20210619164051p:plain
コンパイル後のJSファイル(distディレクトリ)がgit管理されてしまっている

npmのライフサイクルスクリプトであるprepublishOnlyを使うことで、コンパイル後のJSファイルをgit管理下から除外することができます。

今回は、前回TypeScriptで作成したnpmパッケージeslint-plugin-lookbehind-assertionsのコンパイル後のJSファイル(distディレクトリ)をgit管理の対象外にしていきます。

環境

npmのバージョンは7.17.0です。

$ npm -v
7.17.0

prepublishOnlyの設定

まず、.gitignoreを使って、git管理したくないコンパイル後のJSファイル(distディレクトリ)をgit管理の対象外に設定します。

.gitignore

dist

続いて、npm publish前に呼び出されるライフサイクルスクリプトであるprepublishOnlypackage.jsonに設定します。

package.json

  "scripts": {
    "build": "tsc",
    "clean": "rimraf dist",
    "lint": "npx eslint . --ext .ts",
    "test": "jest",
    "test-sample": "eslint src/samples/sample.ts",
    "prepublishOnly": "npm run clean && npm run build"
  },

prepublishOnlyでは、コンパイル後のJSファイルの削除とTSファイルのコンパイル(distディレクトリの作成)を呼び出しています。

"prepublishOnly": "npm run clean && npm run build"

こうすることで、npm publishの直前でdistディレクトリが作成されるため、npmレジストリにはdistディレクトリも含まれた状態でパッケージが公開されます。

動作確認

試しにnpmパッケージeslint-plugin-lookbehind-assertionsを公開してみます。

$ npm version patch
v1.0.1
$ npm publish

> eslint-plugin-lookbehind-assertions@1.0.1 prepublishOnly
> npm run clean && npm run build


> eslint-plugin-lookbehind-assertions@1.0.1 clean
> rimraf dist

... 
> eslint-plugin-lookbehind-assertions@1.0.1 build
> tsc

...

+ eslint-plugin-lookbehind-assertions@1.0.1

npm publishが実行される前にprepublishOnlyが呼び出されてdistディレクトリが作成されていることがわかります。

参考サイト

npmにライブラリを公開してみよう | 株式会社LIG

npm の prepublish と prepare の変遷 - Qiita

npm prepublishOnlyでビルドを呼んではいけない - Qiita

【TypeScript】正規表現の後読み(lookbehind assertions)を禁止するESLintのカスタムルールを作成する

はじめに

RegExp - JavaScript | MDN

f:id:l08084:20210529152110p:plain

上記サイトに記載されている通り、正規表現の後読み(lookbehind assertions)は、一部のブラウザ(Safariなど)で非対応になっているため、開発環境によっては実行時に予期せぬエラーを引き起こす可能性があります。

今回は、そのような事態を防ぐために、正規表現の後読み(lookbehind assertions)を禁止するESLintのカスタムルールを作成していきます。

なお、ESLintのカスタムルールはTypeScriptで作成します。

環境

本記事で作成したESLintのカスタムルールは下記環境で動作確認をしています。

  • JavaScript(TypeScript)のフレームワークであるAngular v12.0.2
  • ESLint v7.27.0

ng versionの実行結果

$ ng version

Angular CLI: 12.0.2
Node: 16.2.0
Package Manager: npm 7.15.0
OS: darwin x64

Angular: 12.0.2
... animations, cli, common, compiler, compiler-cli, core, forms
... platform-browser, platform-browser-dynamic, router

Package                         Version
---------------------------------------------------------
@angular-devkit/architect       0.1200.2
@angular-devkit/build-angular   12.0.2
@angular-devkit/core            12.0.2
@angular-devkit/schematics      12.0.2
@schematics/angular             12.0.2
rxjs                            6.6.7
typescript                      4.2.4

ESLintを動かしてみる

カスタムESLintの作成に入る前に、ESLintを動かす環境を作っていきます。

まず、ESLintでチェックするプロジェクトを作成します。

$ ng new test-eslint

上記のng newコマンドでAngularプロジェクトを作成した後、下記のng add @angular-eslint/schematicsコマンドでAngularプロジェクトにESLintを導入します。

ng add @angular-eslint/schematicsコマンドを実行すると、ESLintがインストールされるだけでなく、Angular向けのESLintのルールの導入も実施されます。

$ cd test-eslint
$ ng add @angular-eslint/schematics

続いて、実際にESLintを動かしてみます。下記の通り、Angularの命名規則を無視した、suffixが不正なComponentクラスを用意します(suffixがCamponentになっている正しくはComponent)。

src/app/app.component.ts

// ...省略
export class AppCamponent {
  title = 'test-eslint';
}

npx eslintコマンドでESLintを実行すると、下記の通りLintエラーが出力されることがわかります。

$ npx eslint ./src/**/*

/Users/takuya/test-eslint/src/app/app.component.ts
  8:14  error  The name of the class AppCamponent should end with the suffix Component (https://angular.io/styleguide#style-02-03)  @angular-eslint/component-class-suffix

✖ 1 problem (1 error, 0 warnings)

ESLintのカスタムルール作成

上記でESLintを動かすのに成功したため、ESLintのカスタムルールを作成していきます。

作成したESLintのカスタムルールのリポジトリです。

github.com

作成したESLintのカスタムルールのフォルダ構成は以下の通りになります。

$ tree -I node_modules
.
├── LICENSE
├── dist
│   ├── index.js
│   └── rules
│       └── no-lookbehind-assertions-regexp.js
├── docs
│   └── rules
│       └── no-lookbehind-assertions-regexp.md
├── jest.config.js
├── package-lock.json
├── package.json
├── src
│   ├── index.ts
│   ├── rules
│   │   └── no-lookbehind-assertions-regexp.ts
│   └── samples
│       └── sample.ts
├── tests
│   └── rules
│       └── no-lookbehind-assertions-regexp.test.ts
└── tsconfig.json

package.json

作成したESLintカスタムルールは、npmパッケージとして公開したいので、まずpackage.jsonを作成します。

package.json

{
  "name": "eslint-plugin-lookbehind-assertions",
  "version": "0.0.1",
  "description": "ESLint plugin for regular expression lookbehind assertions",
  "author": {
    "name": "Takuya Nakayasu",
    "email": "l08084.1989@gmail.com",
    "url": "https://github.com/l08084"
  },
  "repository": {
    "type": "git",
    "url": "git+https://github.com/l08084/eslint-plugin-lookbehind-assertions.git"
  },
  "homepage": "https://github.com/l08084/eslint-plugin-lookbehind-assertions",
  "license": "MIT",
  "keywords": [
    "eslint",
    "eslintplugin",
    "eslint-plugin"
  ],
  "main": "dist/index.js",
  "scripts": {
    "build": "tsc",
    "clean": "rimraf dist",
    "lint": "npx eslint . --ext .ts",
    "test": "jest",
    "test-sample": "eslint src/samples/sample.ts"
  },
  "devDependencies": {
    "@types/jest": "26.0.23",
    "@typescript-eslint/eslint-plugin": "4.26.0",
    "@typescript-eslint/experimental-utils": "4.25.0",
    "@typescript-eslint/parser": "4.26.0",
    "eslint": "7.28.0",
    "eslint-plugin-rulesdir": "0.2.0",
    "jest": "27.0.4",
    "prettier": "2.3.0",
    "rimraf": "3.0.2",
    "ts-jest": "27.0.2",
    "typescript": "4.3.2"
  }
}

インストールしているnpmパッケージについて説明します。

  • @typescript-eslint/experimental-utils
    • ESLintのカスタムルールをTypeScriptで書くときに型などをサポートしてくれるライブラリ
  • @types/jest, jest, ts-jest
    • テスティングフレームワークのJest関連のライブラリ。作成したカスタムルールのテストに使用する
  • eslint-plugin-rulesdir
    • 作成したカスタムルールをプロジェクト内のローカルルールとして使用することができるライブラリ

tsconfig.json

今回、ESLintのカスタムルールはTypeScriptで書くので、tsconfig.jsonを作成します。

tsconfig.json

{
  "compilerOptions": {
    "target": "es5",
    "module": "commonjs",
    "strict": true,
    "outDir": "./dist",
    "esModuleInterop": true,
    "skipLibCheck": true,
    "forceConsistentCasingInFileNames": true
  },
  "include": ["src/**/*"],
  "exclude": ["src/samples/*"]
}

src/samples/配下には、作成したカスタムルールで試しにチェックしたいファイルを配置するだけで、TypeScriptからJavaScriptへの変換の必要がないので、excludeで変換の対象外にしています。

JavaScriptに変換したコードはdist/配下に配置します。

カスタムルール作成

さて、いよいよ本丸のカスタムルール作成に入ります。

カスタムルールを作成するには、まずどのようなコードをリントエラーにしたいか考える必要があります。今回の場合は、下記のようなコードになります。

// safariなどのブラウザーで非対応な正規表現の後読みが使用されているのでリントエラーにしたい
let re = /(?<=ripe )orange/;
re = new RegExp('(?<=ripe )orange');

ESLintは、文字列データであるソースコードを抽象構文木(AST) にしてから解析するライブラリであるため、上記のコードがどのような抽象構文木(AST)に変換されるか確認する必要があります。

AST Explorerというサイトを使用します。以下がソースコードをASTに変換した結果です。(一部省略)

{
  "type": "Literal",
  "start": 20,
  "end": 38,
  "loc": {
    "start": {
      "line": 1,
      "column": 20
    },
    "end": {
      "line": 1,
      "column": 38
    }
  },
  "value": "(?<=ripe )orange",
  "_babelType": "StringLiteral",
  "raw": "'(?<=ripe )orange'"
}

該当のコードはASTでは、typeLiteralのNodeになることがわかりました。それを踏まえて、カスタムルールのコードを作成します。

src/rules/no-lookbehind-assertions-regexp.ts

import { TSESLint } from '@typescript-eslint/experimental-utils';

function getStringValue(node: any): string | undefined {
  if (node.regex) {
    return node.regex.pattern;
  }
  if (typeof node.value === 'string') {
    return node.value;
  }
  return undefined;
}

function isLookbehindAssertions(pattern: string): boolean {
  const positiveLookbehindAssertions = new RegExp('\\(\\?<=.+');
  const negativeLookbehindAssertions = new RegExp('\\(\\?<!.+');
  return (
    positiveLookbehindAssertions.test(pattern) ||
    negativeLookbehindAssertions.test(pattern)
  );
}

export const noLookbehindAssertionsRegexp: TSESLint.RuleModule<
  'noLookbehindAssertionsRegexp',
  []
> = {
  meta: {
    type: 'problem',
    docs: {
      category: 'Possible Errors',
      description:
        'disallow the use of lookbehind assertions((?<= ) and (?<! )) in regular expressions',
      recommended: 'error',
      url: '',
    },
    messages: {
      noLookbehindAssertionsRegexp:
        'Unexpected lookbehind assertions((?<= ) and (?<! )) in regular expression: {{stringValue}}.',
    },
    schema: [],
  },
  create: (context) => {
    return {
      Literal(node) {
        const stringValue = getStringValue(node);
        if (stringValue) {
          if (isLookbehindAssertions(stringValue)) {
            context.report({
              node,
              messageId: 'noLookbehindAssertionsRegexp',
              data: {
                stringValue,
              },
            });
          }
        }
      },
    };
  },
};

module.exports = noLookbehindAssertionsRegexp;
export default noLookbehindAssertionsRegexp;

NodeのTypeがLiteralだったので、Literal()のメソッドを呼び出しています。

下記のコードは、テストコード(Jest)とライブラリeslint-plugin-rulesdirのために書いています。

module.exports = noLookbehindAssertionsRegexp;
export default noLookbehindAssertionsRegexp;

テストコード作成

上記で作成したカスタムルールのテストコード(Jest)を書きます。

tests/rules/no-lookbehind-assertions-regexp.test.ts

import { TSESLint } from '@typescript-eslint/experimental-utils';
import noLookbehindAssertionsRegexp from '../../src/rules/no-lookbehind-assertions-regexp';

const tester = new TSESLint.RuleTester({
  parser: require.resolve('@typescript-eslint/parser'),
});

tester.run('noLookbehindAssertionsRegexp', noLookbehindAssertionsRegexp, {
  valid: [{ code: 'const RE_AS_BS = /aa(?=bb)/' }],
  invalid: [
    {
      code: 'const RE_DOLLAR_PREFIX = /(?<=$)foo/g',
      errors: [{ messageId: 'noLookbehindAssertionsRegexp' }],
    },
    {
      code: `const re = new RegExp('(?<=ripe )orange')`,
      errors: [{ messageId: 'noLookbehindAssertionsRegexp' }],
    },
    {
      code: `const str = '(?<!ripe )orange'`,
      errors: [{ messageId: 'noLookbehindAssertionsRegexp' }],
    },
    {
      code: 'const RE_DOLLAR_PREFIX = /(?<!$)foo/g',
      errors: [{ messageId: 'noLookbehindAssertionsRegexp' }],
    },
  ],
});

validでは、リントエラーが出ないコードを、invalidでは、リントエラーが出るコードを設定します。

続いて、テスティングフレームワークJestを動かすために設定ファイルを作成します。

jest.config.js

module.exports = {
  transform: {
    '^.+\\.ts$': 'ts-jest',
  },
};

準備が整ったので、テストコードを実行すると、以下の様にテストに成功します。

f:id:l08084:20210613153504p:plain
テストに成功する

index.ts作成

作成したカスタムルールをindex.tsexportして外部から使用できる様にします。

import noLookbehindAssertionsRegexp from './rules/no-lookbehind-assertions-regexp';
export = {
  rules: {
    'no-lookbehind-assertions-regexp': noLookbehindAssertionsRegexp,
  },
  configs: {
    all: {
      plugins: ['lookbehind-assertions'],
      rules: {
        'lookbehind-assertions/no-lookbehind-assertions-regexp': 'error',
      },
    },
    recommended: {
      plugins: ['lookbehind-assertions'],
      rules: {
        'lookbehind-assertions/no-lookbehind-assertions-regexp': 'error',
      },
    },
  },
};

rules:で設定することで外部からルールを使用できる様にしています。また、configsallrecommendedの設定もしています。

動作確認

作成したESLintのカスタムルールのnpmパッケージを最初に作成したAngularプロジェクトに取り込んで試しに動かしてみます。

$ npm i https://github.com/l08084/eslint-plugin-lookbehind-assertions.git -D

npmパッケージeslint-plugin-lookbehind-assertionsをインストールした後、ESLintの設定ファイルを以下の様に更新します。

plugins: []には取り込みたいプラグインのnpmパッケージ名を書きます(今回はeslint-plugin-lookbehind-assertions)。eslint-pluginの部分は省略できるため、"plugins": ["lookbehind-assertions"]と書いています。

また、rules: []に設定したいルールであるlookbehind-assertions/no-lookbehind-assertions-regexpを追加します。([プラグイン名]/[パッケージ名])

.eslintrc.json

{
  "root": true,
  "ignorePatterns": ["projects/**/*"],
  "overrides": [
    {
      "files": ["*.ts"],
      "parserOptions": {
        "project": ["tsconfig.json", "e2e/tsconfig.json"],
        "createDefaultProgram": true
      },
      // ...
      "plugins": ["lookbehind-assertions"],
      "rules": {
         // ...
        "lookbehind-assertions/no-lookbehind-assertions-regexp": "error"
      }
    }
    // ...
  ]
}

index.tsで、allrecommendedの設定をしているため、下記の様に設定しても、該当のルールを動かすことができます。(allrecommendedを使用した場合、pluginsrulesの設定は省略できる)

"extends": ["plugin:lookbehind-assertions/recommended"],
"extends": ["plugin:lookbehind-assertions/all"],

準備ができたので、ESLintを実行します。

f:id:l08084:20210613155935p:plain
正規表現の後読みがリントエラーとして指摘されている

作成したカスタムルールがうまく動いていることがわかります。

npmパッケージ公開

カスタムルールの作成が完了したので、npmパッケージとして公開します。

$ npm publish ./

公開したnpmパッケージ

www.npmjs.com

参考サイト

Eslintの独自ルールをリポジトリに追加したい

プロジェクト内で完結するESLintのローカルルールを作りたい

angular-eslint/packages/eslint-plugin/src/rules at master · angular-eslint/angular-eslint · GitHub

TypeScript で eslint-plugin を作成する

Custom (local) ESLint rules for TypeScript - Qiita

GitHub - typescript-eslint/typescript-eslint: Monorepo for all the tooling which enables ESLint to support TypeScript

GitHub - angular-eslint/angular-eslint: Monorepo for all the tooling related to using ESLint with Angular

GitHub - tc39/proposal-regexp-lookbehind: RegExp lookbehind assertions

RegExp - JavaScript | MDN

ESLintの設定をパッケージ化してnpmで公開する

ESLint をグローバルにインストールせずに使う - Qiita

Create custom ESLint rules in 2 minutes | Webiny

GitHub - francoismassart/eslint-plugin-tailwindcss: ESLint plugin for Tailwind CSS usage

TypeScript + Node.js プロジェクトのはじめかた2020 - Qiita

Jest - TypeScript Deep Dive 日本語版

eslint/prefer-regex-literals.js at master · eslint/eslint · GitHub

eslint/no-control-regex.js at master · eslint/eslint · GitHub