イントロ
前前回の記事で作成した、angular2-google-mapsのデモアプリに、渋滞状況表示のデモを追加した。
開発環境
Angular@2.4.1
angular2-google-maps@0.17.0
typescript@2.0.10
渋滞状況の表示(traffic layer)とは
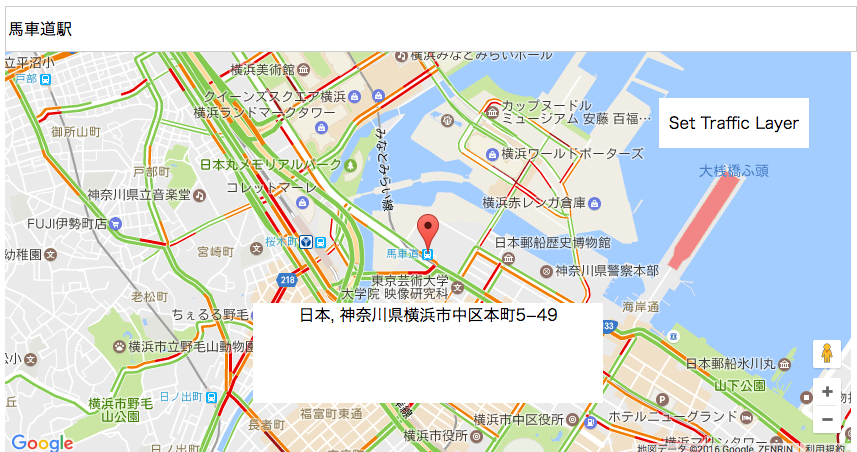
道路の混雑状況を色で表示する(空いていれば緑、混雑していれば赤)、Google Mapの機能。
渋滞状況表示のデモ
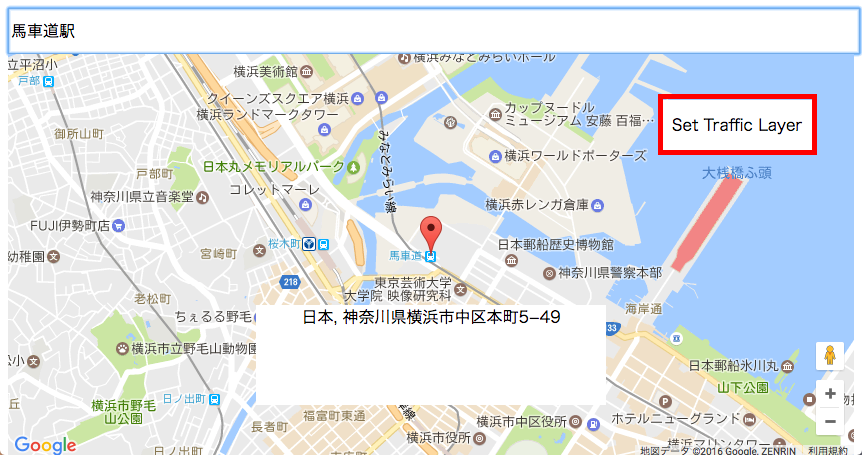
「Set Traffic Layer」と記載されたボタンを押下
Google Map上に渋滞状況が表示される
渋滞状況表示前

渋滞状況表示後

ソースコード
- src/app/app.component.ts
import { Component, OnInit } from '@angular/core';
import { NgForm } from '@angular/forms';
import { MapService } from '../services/map.service';

@Component({
  selector: 'app-root',
  templateUrl: './app.component.html',
  styleUrls: ['./app.component.css']
})
export class AppComponent implements OnInit {
  lat: number = 35.6329007;
  lng: number = 139.8782003;
  zoom: number = 15;
  address: string = '';
  trafficSwitch: number = 0;

  constructor(
    public mapService: MapService,
  ) {}

  public ngOnInit() {
    this.getAddress();
  }

  public geocoding(f: NgForm) {
    let self = this;

    this.mapService.geocoding(f.value.address).then(
      rtn => {
        let location = rtn[0].geometry.location;

        self.lat = location.lat();
        self.lng = location.lng();

        // call reverse geocoding
        self.getAddress();
      }
    );
  }

  public getAddress() {
    let self = this;

    this.mapService.reverseGeocoding(this.lat, this.lng).then(
      rtn => {
        self.address = rtn[0].formatted_address;
      }
    );
  }

  public setTrafficLayer() {
    this.trafficSwitch = 1 - this.trafficSwitch;
  }
}
- src/app/app.component.html
<form #f="ngForm" (ngSubmit)="geocoding(f)" novalidate>
  <input type="text" name="address" placeholder="場所を入力してください...(例:品川駅)" ngModel>
</form>
<div class="address-panel">{{ address }}</div>
<div class="trafficButton" (click)="setTrafficLayer()">Set Traffic Layer</div>
<sebm-google-map [latitude]="lat" [longitude]="lng" [zoom]="zoom">
  <sebm-google-map-marker [latitude]="lat" [longitude]="lng"></sebm-google-map-marker>
  <map-content #map [trafficSwitch]="trafficSwitch"></map-content>
</sebm-google-map>
- src/components/map/map-content.component.ts
import { Component, Input } from '@angular/core';

import { GoogleMapsAPIWrapper } from 'angular2-google-maps/core';

declare var google: any;

/**
 * MapContentComponent
 *
 * @export
 * @class MapContentComponent
 */
@Component({
  selector: 'map-content',
  template: ''
})
export class MapContentComponent {
  private trafficLayer: any;

  @Input() public set trafficSwitch(trafficSwitch: number) {
    this.trafficToggle(trafficSwitch);
  }

  /**
   * Creates an instance of MapContentComponent.
   *
   * @param {GoogleMapsAPIWrapper} mapApiWrapper
   *
   * @memberOf MapContentComponent
   */
  constructor(
    private mapApiWrapper: GoogleMapsAPIWrapper,
  ) {
    // none
  }

  /**
   * Set traffic layer
   *
   * @param {number} state
   *
   * @memberOf MapContentComponent
   */
  public trafficToggle(state: number) {
    let self = this;
    this.mapApiWrapper.getNativeMap()
      .then((map) => {
        self.trafficLayer = self.trafficLayer ? self.trafficLayer : new google.maps.TrafficLayer();
        let targetMap = state === 1 ? map : null;

        self.trafficLayer.setMap(targetMap);
      });
  }

}
GoogleMapsAPIWrapperのgetNativeMap()を呼び出して、mapオブジェクトを取得しているところがポイント
デモアプリケーションは、下記URLに格納してます。