はじめに

上記サイトに記載されている通り、正規表現の後読み(lookbehind assertions)は、一部のブラウザ(Safariなど)で非対応になっているため、開発環境によっては実行時に予期せぬエラーを引き起こす可能性があります。
今回は、そのような事態を防ぐために、正規表現の後読み(lookbehind assertions)を禁止するESLintのカスタムルールを作成していきます。
なお、ESLintのカスタムルールはTypeScriptで作成します。
環境
本記事で作成したESLintのカスタムルールは下記環境で動作確認をしています。
- JavaScript(TypeScript)のフレームワークであるAngular v12.0.2
- ESLint v7.27.0
ng versionの実行結果
$ ng version

Angular CLI: 12.0.2
Node: 16.2.0
Package Manager: npm 7.15.0
OS: darwin x64

Angular: 12.0.2
... animations, cli, common, compiler, compiler-cli, core, forms
... platform-browser, platform-browser-dynamic, router

Package                         Version
---------------------------------------------------------
@angular-devkit/architect       0.1200.2
@angular-devkit/build-angular   12.0.2
@angular-devkit/core            12.0.2
@angular-devkit/schematics      12.0.2
@schematics/angular             12.0.2
rxjs                            6.6.7
typescript                      4.2.4
ESLintを動かしてみる
カスタムESLintの作成に入る前に、ESLintを動かす環境を作っていきます。
まず、ESLintでチェックするプロジェクトを作成します。
$ ng new test-eslint
上記のng newコマンドでAngularプロジェクトを作成した後、下記のng add @angular-eslint/schematicsコマンドでAngularプロジェクトにESLintを導入します。
ng add @angular-eslint/schematicsコマンドを実行すると、ESLintがインストールされるだけでなく、Angular向けのESLintのルールの導入も実施されます。
$ cd test-eslint
$ ng add @angular-eslint/schematics
続いて、実際にESLintを動かしてみます。下記の通り、Angularの命名規則を無視した、suffixが不正なComponentクラスを用意します(suffixがCamponentになっている正しくはComponent)。
src/app/app.component.ts
// ...省略
export class AppCamponent {
  title = 'test-eslint';
}
npx eslintコマンドでESLintを実行すると、下記の通りLintエラーが出力されることがわかります。
$ npx eslint ./src/**/*

/Users/takuya/test-eslint/src/app/app.component.ts
  8:14  error  The name of the class AppCamponent should end with the suffix Component (https://angular.io/styleguide#style-02-03)  @angular-eslint/component-class-suffix

✖ 1 problem (1 error, 0 warnings)
ESLintのカスタムルール作成
上記でESLintを動かすのに成功したため、ESLintのカスタムルールを作成していきます。
作成したESLintのカスタムルールのリポジトリです。
作成したESLintのカスタムルールのフォルダ構成は以下の通りになります。
$ tree -I node_modules
.
├── LICENSE
├── dist
│   ├── index.js
│   └── rules
│       └── no-lookbehind-assertions-regexp.js
├── docs
│   └── rules
│       └── no-lookbehind-assertions-regexp.md
├── jest.config.js
├── package-lock.json
├── package.json
├── src
│   ├── index.ts
│   ├── rules
│   │   └── no-lookbehind-assertions-regexp.ts
│   └── samples
│       └── sample.ts
├── tests
│   └── rules
│       └── no-lookbehind-assertions-regexp.test.ts
└── tsconfig.json
package.json
作成したESLintカスタムルールは、npmパッケージとして公開したいので、まずpackage.jsonを作成します。
package.json
{
  "name": "eslint-plugin-lookbehind-assertions",
  "version": "0.0.1",
  "description": "ESLint plugin for regular expression lookbehind assertions",
  "author": {
    "name": "Takuya Nakayasu",
    "email": "l08084.1989@gmail.com",
    "url": "https://github.com/l08084"
  },
  "repository": {
    "type": "git",
    "url": "git+https://github.com/l08084/eslint-plugin-lookbehind-assertions.git"
  },
  "homepage": "https://github.com/l08084/eslint-plugin-lookbehind-assertions",
  "license": "MIT",
  "keywords": [
    "eslint",
    "eslintplugin",
    "eslint-plugin"
  ],
  "main": "dist/index.js",
  "scripts": {
    "build": "tsc",
    "clean": "rimraf dist",
    "lint": "npx eslint . --ext .ts",
    "test": "jest",
    "test-sample": "eslint src/samples/sample.ts"
  },
  "devDependencies": {
    "@types/jest": "26.0.23",
    "@typescript-eslint/eslint-plugin": "4.26.0",
    "@typescript-eslint/experimental-utils": "4.25.0",
    "@typescript-eslint/parser": "4.26.0",
    "eslint": "7.28.0",
    "eslint-plugin-rulesdir": "0.2.0",
    "jest": "27.0.4",
    "prettier": "2.3.0",
    "rimraf": "3.0.2",
    "ts-jest": "27.0.2",
    "typescript": "4.3.2"
  }
}
インストールしているnpmパッケージについて説明します。
@typescript-eslint/experimental-utils- ESLintのカスタムルールをTypeScriptで書くときに型などをサポートしてくれるライブラリ
@types/jest,jest,ts-jest- テスティングフレームワークのJest関連のライブラリ。作成したカスタムルールのテストに使用する
eslint-plugin-rulesdir- 作成したカスタムルールをプロジェクト内のローカルルールとして使用することができるライブラリ
tsconfig.json
今回、ESLintのカスタムルールはTypeScriptで書くので、tsconfig.jsonを作成します。
tsconfig.json
{
  "compilerOptions": {
    "target": "es5",
    "module": "commonjs",
    "strict": true,
    "outDir": "./dist",
    "esModuleInterop": true,
    "skipLibCheck": true,
    "forceConsistentCasingInFileNames": true
  },
  "include": ["src/**/*"],
  "exclude": ["src/samples/*"]
}
src/samples/配下には、作成したカスタムルールで試しにチェックしたいファイルを配置するだけで、TypeScriptからJavaScriptへの変換の必要がないので、excludeで変換の対象外にしています。
JavaScriptに変換したコードはdist/配下に配置します。
カスタムルール作成
さて、いよいよ本丸のカスタムルール作成に入ります。
カスタムルールを作成するには、まずどのようなコードをリントエラーにしたいか考える必要があります。今回の場合は、下記のようなコードになります。
// safariなどのブラウザーで非対応な正規表現の後読みが使用されているのでリントエラーにしたい
let re = /(?<=ripe )orange/;
re = new RegExp('(?<=ripe )orange');
ESLintは、文字列データであるソースコードを抽象構文木(AST) にしてから解析するライブラリであるため、上記のコードがどのような抽象構文木(AST)に変換されるか確認する必要があります。
AST Explorerというサイトを使用します。以下がソースコードをASTに変換した結果です。(一部省略)
{
  "type": "Literal",
  "start": 20,
  "end": 38,
  "loc": {
    "start": {
      "line": 1,
      "column": 20
    },
    "end": {
      "line": 1,
      "column": 38
    }
  },
  "value": "(?<=ripe )orange",
  "_babelType": "StringLiteral",
  "raw": "'(?<=ripe )orange'"
}
該当のコードはASTでは、typeがLiteralのNodeになることがわかりました。それを踏まえて、カスタムルールのコードを作成します。
src/rules/no-lookbehind-assertions-regexp.ts
import { TSESLint } from '@typescript-eslint/experimental-utils';

function getStringValue(node: any): string | undefined {
  if (node.regex) {
    return node.regex.pattern;
  }
  if (typeof node.value === 'string') {
    return node.value;
  }
  return undefined;
}

function isLookbehindAssertions(pattern: string): boolean {
  const positiveLookbehindAssertions = new RegExp('\\(\\?<=.+');
  const negativeLookbehindAssertions = new RegExp('\\(\\?<!.+');
  return (
    positiveLookbehindAssertions.test(pattern) ||
    negativeLookbehindAssertions.test(pattern)
  );
}

export const noLookbehindAssertionsRegexp: TSESLint.RuleModule<
  'noLookbehindAssertionsRegexp',
  []
> = {
  meta: {
    type: 'problem',
    docs: {
      category: 'Possible Errors',
      description:
        'disallow the use of lookbehind assertions((?<= ) and (?<! )) in regular expressions',
      recommended: 'error',
      url: '',
    },
    messages: {
      noLookbehindAssertionsRegexp:
        'Unexpected lookbehind assertions((?<= ) and (?<! )) in regular expression: {{stringValue}}.',
    },
    schema: [],
  },
  create: (context) => {
    return {
      Literal(node) {
        const stringValue = getStringValue(node);
        if (stringValue) {
          if (isLookbehindAssertions(stringValue)) {
            context.report({
              node,
              messageId: 'noLookbehindAssertionsRegexp',
              data: {
                stringValue,
              },
            });
          }
        }
      },
    };
  },
};

module.exports = noLookbehindAssertionsRegexp;
export default noLookbehindAssertionsRegexp;
NodeのTypeがLiteralだったので、Literal()のメソッドを呼び出しています。
下記のコードは、テストコード(Jest)とライブラリeslint-plugin-rulesdirのために書いています。
module.exports = noLookbehindAssertionsRegexp;
export default noLookbehindAssertionsRegexp;
テストコード作成
上記で作成したカスタムルールのテストコード(Jest)を書きます。
tests/rules/no-lookbehind-assertions-regexp.test.ts
import { TSESLint } from '@typescript-eslint/experimental-utils';
import noLookbehindAssertionsRegexp from '../../src/rules/no-lookbehind-assertions-regexp';

const tester = new TSESLint.RuleTester({
  parser: require.resolve('@typescript-eslint/parser'),
});

tester.run('noLookbehindAssertionsRegexp', noLookbehindAssertionsRegexp, {
  valid: [{ code: 'const RE_AS_BS = /aa(?=bb)/' }],
  invalid: [
    {
      code: 'const RE_DOLLAR_PREFIX = /(?<=$)foo/g',
      errors: [{ messageId: 'noLookbehindAssertionsRegexp' }],
    },
    {
      code: `const re = new RegExp('(?<=ripe )orange')`,
      errors: [{ messageId: 'noLookbehindAssertionsRegexp' }],
    },
    {
      code: `const str = '(?<!ripe )orange'`,
      errors: [{ messageId: 'noLookbehindAssertionsRegexp' }],
    },
    {
      code: 'const RE_DOLLAR_PREFIX = /(?<!$)foo/g',
      errors: [{ messageId: 'noLookbehindAssertionsRegexp' }],
    },
  ],
});
validでは、リントエラーが出ないコードを、invalidでは、リントエラーが出るコードを設定します。
続いて、テスティングフレームワークJestを動かすために設定ファイルを作成します。
jest.config.js
module.exports = {
  transform: {
    '^.+\\.ts$': 'ts-jest',
  },
};
準備が整ったので、テストコードを実行すると、以下の様にテストに成功します。

index.ts作成
作成したカスタムルールをindex.tsでexportして外部から使用できる様にします。
import noLookbehindAssertionsRegexp from './rules/no-lookbehind-assertions-regexp';
export = {
  rules: {
    'no-lookbehind-assertions-regexp': noLookbehindAssertionsRegexp,
  },
  configs: {
    all: {
      plugins: ['lookbehind-assertions'],
      rules: {
        'lookbehind-assertions/no-lookbehind-assertions-regexp': 'error',
      },
    },
    recommended: {
      plugins: ['lookbehind-assertions'],
      rules: {
        'lookbehind-assertions/no-lookbehind-assertions-regexp': 'error',
      },
    },
  },
};
rules:で設定することで外部からルールを使用できる様にしています。また、configsでallとrecommendedの設定もしています。
動作確認
作成したESLintのカスタムルールのnpmパッケージを最初に作成したAngularプロジェクトに取り込んで試しに動かしてみます。
$ npm i https://github.com/l08084/eslint-plugin-lookbehind-assertions.git -D
npmパッケージeslint-plugin-lookbehind-assertionsをインストールした後、ESLintの設定ファイルを以下の様に更新します。
plugins: []には取り込みたいプラグインのnpmパッケージ名を書きます(今回はeslint-plugin-lookbehind-assertions)。eslint-pluginの部分は省略できるため、"plugins": ["lookbehind-assertions"]と書いています。
また、rules: []に設定したいルールであるlookbehind-assertions/no-lookbehind-assertions-regexpを追加します。([プラグイン名]/[パッケージ名])
.eslintrc.json
{
  "root": true,
  "ignorePatterns": ["projects/**/*"],
  "overrides": [
    {
      "files": ["*.ts"],
      "parserOptions": {
        "project": ["tsconfig.json", "e2e/tsconfig.json"],
        "createDefaultProgram": true
      },
      // ...
      "plugins": ["lookbehind-assertions"],
      "rules": {
         // ...
        "lookbehind-assertions/no-lookbehind-assertions-regexp": "error"
      }
    }
    // ...
  ]
}
index.tsで、allとrecommendedの設定をしているため、下記の様に設定しても、該当のルールを動かすことができます。(allとrecommendedを使用した場合、pluginsとrulesの設定は省略できる)
"extends": ["plugin:lookbehind-assertions/recommended"],
"extends": ["plugin:lookbehind-assertions/all"],
準備ができたので、ESLintを実行します。
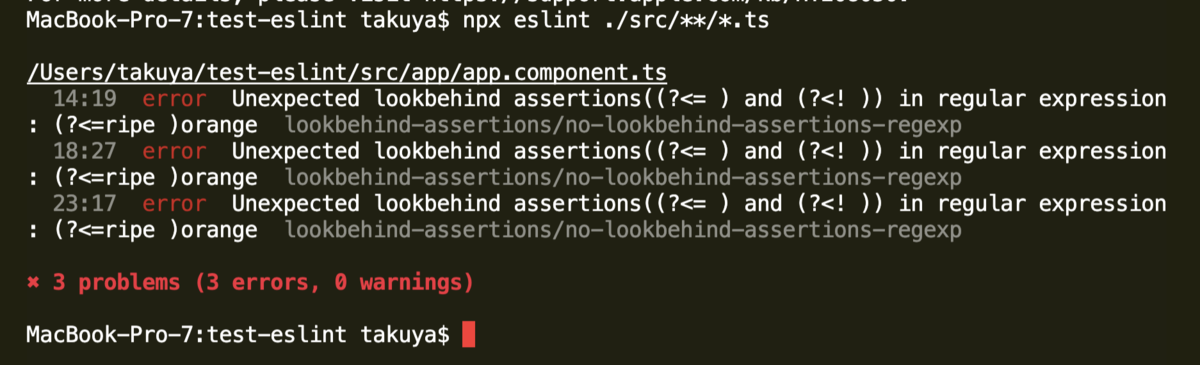
作成したカスタムルールがうまく動いていることがわかります。
npmパッケージ公開
カスタムルールの作成が完了したので、npmパッケージとして公開します。
$ npm publish ./
公開したnpmパッケージ
参考サイト
プロジェクト内で完結するESLintのローカルルールを作りたい
angular-eslint/packages/eslint-plugin/src/rules at master · angular-eslint/angular-eslint · GitHub
TypeScript で eslint-plugin を作成する
Custom (local) ESLint rules for TypeScript - Qiita
GitHub - tc39/proposal-regexp-lookbehind: RegExp lookbehind assertions
ESLint をグローバルにインストールせずに使う - Qiita
Create custom ESLint rules in 2 minutes | Webiny
GitHub - francoismassart/eslint-plugin-tailwindcss: ESLint plugin for Tailwind CSS usage
TypeScript + Node.js プロジェクトのはじめかた2020 - Qiita
Jest - TypeScript Deep Dive 日本語版
eslint/prefer-regex-literals.js at master · eslint/eslint · GitHub
eslint/no-control-regex.js at master · eslint/eslint · GitHub