中安拓也のブログ

プログラミングについて書くブログ

Angular + Firebase でGitHub認証

f:id:l08084:20201025172314p:plain

はじめに

Ionic(Angular)のアプリでFirebase認証によるGitHubのサインイン処理を実装します。

関連記事

メールアドレス/パスワード、Twitter、Facebook、GoogleのFirebase認証については過去に記事にしています。

  • メールアドレス/パスワードによる認証

AngularでFirebase認証(その1) Firebaseのセットアップ - 中安拓也のブログ

AngularでFirebase認証(その2) Angular Materialを使ったログイン画面の作成 - 中安拓也のブログ

AngularでFirebase認証(その3) Firebase Authentication の呼び出し - 中安拓也のブログ

Angular + Firebase でアカウント登録画面の作成 - 中安拓也のブログ

  • Twitter認証

Angular + Firebase でTwitter認証 - 中安拓也のブログ

  • Facebook認証

Angular + Firebase でFacebook認証 - 中安拓也のブログ

  • Google認証

Angular + Firebase でGoogle認証 - 中安拓也のブログ

  • Firebase認証のリダイレクトモード

【Angular】リダイレクトモードでFirebase認証を行う - 中安拓也のブログ

環境

ハイブリットモバイルアプリ用フレームワークであるIonic(Angular)とFirebaseを使用してアプリを作成しています。

  • firebase@7.21.1

$ ionic infoコマンドの実行結果

$ ionic info

Ionic:

   Ionic CLI                     : 6.11.8 (/usr/local/lib/node_modules/@ionic/cli)
   Ionic Framework               : @ionic/angular 5.3.3
   @angular-devkit/build-angular : 0.1000.8
   @angular-devkit/schematics    : 10.0.8
   @angular/cli                  : 10.0.8
   @ionic/angular-toolkit        : 2.3.3

Capacitor:

   Capacitor CLI   : 2.4.1
   @capacitor/core : 2.4.1

Utility:

   cordova-res : not installed
   native-run  : not installed

System:

   NodeJS : v12.13.1 (/usr/local/bin/node)
   npm    : 5.6.0
   OS     : macOS Catalina

Step1: FirebaseコンソールでGitHub認証を有効にする

Firebaseのコンソールを開いて、[Authentication] セクションを開きます。

続いて、[ログイン方法] タブで、トグルを操作して、[GitHub] プロバイダを有効にしようとします。
f:id:l08084:20201025184514p:plain
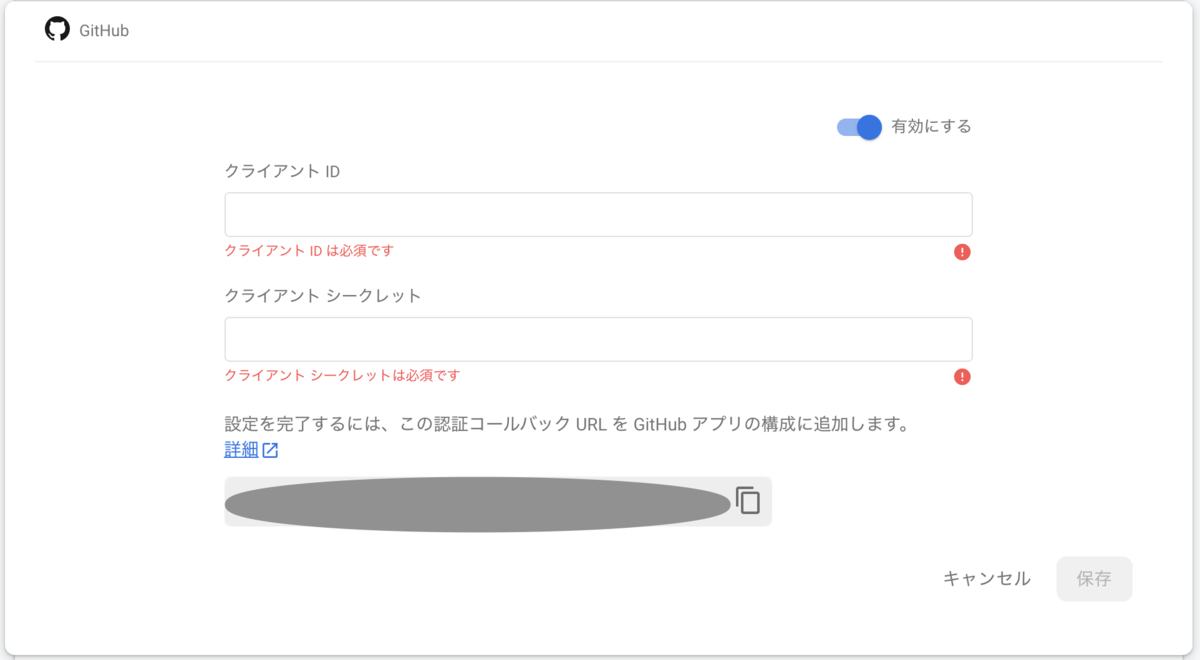
クライアントIDとクライアントシークレットがないため、有効にできない

この時点では、クライアントIDとクライアントシークレットがないため、GitHubプロバイダを有効にできません。この画面からStep2で必要になる認証コールバック URL だけコピーしてStep2に進みます。

Step2: GitHubからクライアントIDとクライアントシークレットを取得する

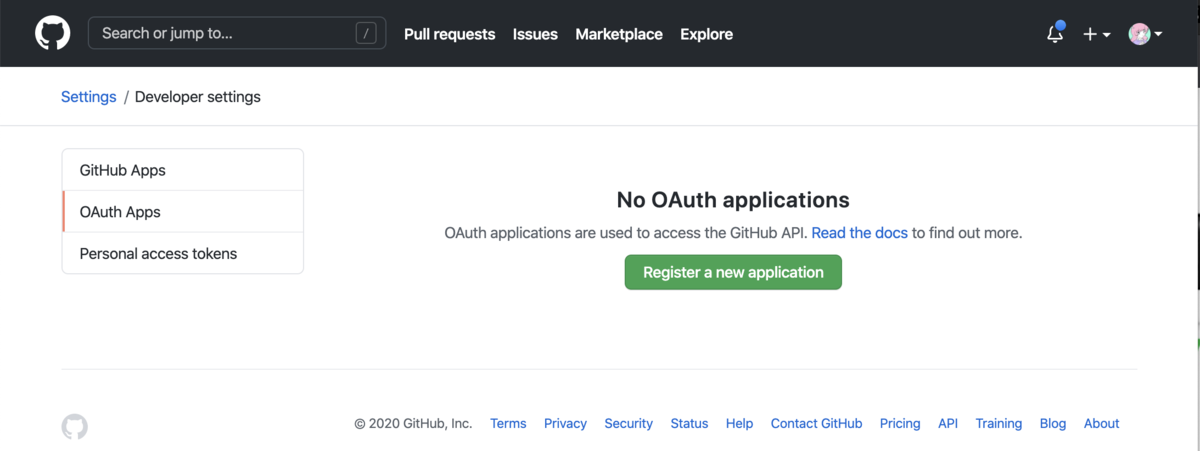
このリンクでGitHubにアプリを登録し、クライアントIDとクライアントシークレットを取得します。
f:id:l08084:20201025185234p:plain
Register a new applicationをクリックしてアプリを登録する

続いて、Register a new application ボタンをクリックしてアプリの登録画面に進みます。

f:id:l08084:20201025185647p:plain
アプリの登録画面

Authorization callback URLの欄にはStep1で取得した認証コールバック URLを入力します。

アプリの登録が完了すると、クライアントIDとクライアントシークレットが発行されるので、Step1に戻ってFirebaseコンソールからGitHub認証を有効にします。

Step3: GitHubログインボタンのテンプレートを作成する

login.page.html

      <ion-button (click)="signInWithGitHub()" color="github" class="login-button border">
        <ion-icon class="sns-icon" name="logo-github"></ion-icon>GitHubでログイン
      </ion-button>

Step4: リダイレクトモードでFirebase認証(GitHub)

モバイルデバイスによる認証を想定しているため、FirebaseのGitHub認証をリダイレクトモード(signInWithRedirect)で実装していきます。

下記のコードはFirebase認証を呼び出すサービスクラスです。ログイン画面から呼び出されます。

authentication.service.ts

export class AuthenticationService {
  constructor(public afAuth: AngularFireAuth) {}

  /**
   * GitHub認証を呼び出す。
   * 認証成功時にリダイレクトする。
   *
   * @returns {Promise<void>}
   * @memberof AuthenticationService
   */
  public signInWithGitHub(): Promise<void> {
    return this.afAuth.signInWithRedirect(
      new firebase.auth.GithubAuthProvider()
    );
  }

  /**
   * リダイレクト後の処理。
   *
   * @returns {Promise<firebase.auth.UserCredential>}
   * @memberof AuthenticationService
   */
  public getRedirectResult(): Promise<firebase.auth.UserCredential> {
    return this.afAuth.getRedirectResult();
  }
}

下記のコードはログイン画面のコンポーネントクラスです。

login.page.ts

export class LoginPage implements OnInit {
  constructor(
    private authenticationService: AuthenticationService,
    private router: Router
  ) {}

  ngOnInit() {
    this.getRedirectResult();
  }

  /**
   * GitHubで認証する。
   *
   * @memberof LoginPage
   */
  public async signInWithGitHub() {
    await this.authenticationService.signInWithGitHub();
  }

  /**
   * リダイレクト後に呼び出される処理。
   *
   * @private
   * @memberof LoginPage
   */
  private async getRedirectResult() {
    const result: firebase.auth.UserCredential = await this.authenticationService.getRedirectResult();
    try {
      if (result.user != null) {
        this.router.navigate(['/weight/tabs/tab1']);
      }
    } catch (error) {
      console.log(error);
    }
  }
}

上記のコードで行っているのは、下記の内容です。

  1. ユーザーがsignInWithGitHub()でログインします。
  2. GitHub でログインを行うため、signInWithRedirect()メソッドによってリダイレクトがトリガーされます。
  3. GitHubログインをすると、ユーザーはログイン画面のコンポーネントに戻されます。
  4. ユーザーのログインは、ログイン画面のngOnInit()内のgetRedirectResult()で返される Promise によって解決されます。
  5. navigate()メソッドで、ルーターがユーザーを/weight/tabs/tab1に移動させます。

参考サイト

JavaScript による GitHub を使用した認証  |  Firebase

Firebase - Github Authentication - Tutorialspoint

Firebase-github-authentication - Dev Guides

【Ionic v5】ダークモードを無効にする

はじめに

ダークモード対応が面倒なので、Ionicがデフォルトで対応してくれているダークモードを解除したい。

f:id:l08084:20201025152207p:plain
外観モードをライトにした場合

f:id:l08084:20201025152302p:plain
外観モードをダークにした場合

環境

ハイブリットモバイルアプリ用フレームワークであるIonic(Angular)を使用してアプリを作成しています。

$ ionic infoコマンドの実行結果

$ ionic info

Ionic:

   Ionic CLI                     : 6.11.8 (/usr/local/lib/node_modules/@ionic/cli)
   Ionic Framework               : @ionic/angular 5.3.3
   @angular-devkit/build-angular : 0.1000.8
   @angular-devkit/schematics    : 10.0.8
   @angular/cli                  : 10.0.8
   @ionic/angular-toolkit        : 2.3.3

Capacitor:

   Capacitor CLI   : 2.4.1
   @capacitor/core : 2.4.1

Utility:

   cordova-res : not installed
   native-run  : not installed

System:

   NodeJS : v12.13.1 (/usr/local/bin/node)
   npm    : 5.6.0
   OS     : macOS Catalina

ダークテーマを無効にする

variables.scssから@media (prefers-color-scheme: dark) {のブロックを削除すると、Ionicのダークモード対応が無効になります。

src/theme/variables.scss

@media (prefers-color-scheme: dark) {
  /*
   * Dark Colors
   * -------------------------------------------
   */

  body {
    --ion-color-primary: #428cff;
    --ion-color-primary-rgb: 66, 140, 255;
    --ion-color-primary-contrast: #ffffff;
    --ion-color-primary-contrast-rgb: 255, 255, 255;
    --ion-color-primary-shade: #3a7be0;
    --ion-color-primary-tint: #5598ff;

    --ion-color-secondary: #50c8ff;
    --ion-color-secondary-rgb: 80, 200, 255;
    --ion-color-secondary-contrast: #ffffff;
    --ion-color-secondary-contrast-rgb: 255, 255, 255;
    --ion-color-secondary-shade: #46b0e0;
    --ion-color-secondary-tint: #62ceff;

    --ion-color-tertiary: #6a64ff;
    --ion-color-tertiary-rgb: 106, 100, 255;
    --ion-color-tertiary-contrast: #ffffff;
    --ion-color-tertiary-contrast-rgb: 255, 255, 255;
    --ion-color-tertiary-shade: #5d58e0;
    --ion-color-tertiary-tint: #7974ff;

    --ion-color-success: #2fdf75;
    --ion-color-success-rgb: 47, 223, 117;
    --ion-color-success-contrast: #000000;
    --ion-color-success-contrast-rgb: 0, 0, 0;
    --ion-color-success-shade: #29c467;
    --ion-color-success-tint: #44e283;

    --ion-color-warning: #ffd534;
    --ion-color-warning-rgb: 255, 213, 52;
    --ion-color-warning-contrast: #000000;
    --ion-color-warning-contrast-rgb: 0, 0, 0;
    --ion-color-warning-shade: #e0bb2e;
    --ion-color-warning-tint: #ffd948;

    --ion-color-danger: #ff4961;
    --ion-color-danger-rgb: 255, 73, 97;
    --ion-color-danger-contrast: #ffffff;
    --ion-color-danger-contrast-rgb: 255, 255, 255;
    --ion-color-danger-shade: #e04055;
    --ion-color-danger-tint: #ff5b71;

    --ion-color-dark: #f4f5f8;
    --ion-color-dark-rgb: 244, 245, 248;
    --ion-color-dark-contrast: #000000;
    --ion-color-dark-contrast-rgb: 0, 0, 0;
    --ion-color-dark-shade: #d7d8da;
    --ion-color-dark-tint: #f5f6f9;

    --ion-color-medium: #989aa2;
    --ion-color-medium-rgb: 152, 154, 162;
    --ion-color-medium-contrast: #000000;
    --ion-color-medium-contrast-rgb: 0, 0, 0;
    --ion-color-medium-shade: #86888f;
    --ion-color-medium-tint: #a2a4ab;

    --ion-color-light: #222428;
    --ion-color-light-rgb: 34, 36, 40;
    --ion-color-light-contrast: #ffffff;
    --ion-color-light-contrast-rgb: 255, 255, 255;
    --ion-color-light-shade: #1e2023;
    --ion-color-light-tint: #383a3e;
  }

  /*
   * iOS Dark Theme
   * -------------------------------------------
   */

  .ios body {
    --ion-background-color: #000000;
    --ion-background-color-rgb: 0, 0, 0;

    --ion-text-color: #ffffff;
    --ion-text-color-rgb: 255, 255, 255;

    --ion-color-step-50: #0d0d0d;
    --ion-color-step-100: #1a1a1a;
    --ion-color-step-150: #262626;
    --ion-color-step-200: #333333;
    --ion-color-step-250: #404040;
    --ion-color-step-300: #4d4d4d;
    --ion-color-step-350: #595959;
    --ion-color-step-400: #666666;
    --ion-color-step-450: #737373;
    --ion-color-step-500: #808080;
    --ion-color-step-550: #8c8c8c;
    --ion-color-step-600: #999999;
    --ion-color-step-650: #a6a6a6;
    --ion-color-step-700: #b3b3b3;
    --ion-color-step-750: #bfbfbf;
    --ion-color-step-800: #cccccc;
    --ion-color-step-850: #d9d9d9;
    --ion-color-step-900: #e6e6e6;
    --ion-color-step-950: #f2f2f2;

    --ion-toolbar-background: #0d0d0d;

    --ion-item-background: #000000;

    --ion-card-background: #1c1c1d;
  }


  /*
   * Material Design Dark Theme
   * -------------------------------------------
   */

  .md body {
    --ion-background-color: #121212;
    --ion-background-color-rgb: 18, 18, 18;

    --ion-text-color: #ffffff;
    --ion-text-color-rgb: 255, 255, 255;

    --ion-border-color: #222222;

    --ion-color-step-50: #1e1e1e;
    --ion-color-step-100: #2a2a2a;
    --ion-color-step-150: #363636;
    --ion-color-step-200: #414141;
    --ion-color-step-250: #4d4d4d;
    --ion-color-step-300: #595959;
    --ion-color-step-350: #656565;
    --ion-color-step-400: #717171;
    --ion-color-step-450: #7d7d7d;
    --ion-color-step-500: #898989;
    --ion-color-step-550: #949494;
    --ion-color-step-600: #a0a0a0;
    --ion-color-step-650: #acacac;
    --ion-color-step-700: #b8b8b8;
    --ion-color-step-750: #c4c4c4;
    --ion-color-step-800: #d0d0d0;
    --ion-color-step-850: #dbdbdb;
    --ion-color-step-900: #e7e7e7;
    --ion-color-step-950: #f3f3f3;

    --ion-item-background: #1e1e1e;

    --ion-toolbar-background: #1f1f1f;

    --ion-tab-bar-background: #1f1f1f;

    --ion-card-background: #1e1e1e;
  }
}

variables.scssの上記の部分を削除すると、端末の設定をダークモードにしても、Ionicアプリはダークモードにならなくなります。

f:id:l08084:20201025152207p:plain
外観モードをダークにしてもIonicアプリの色はライトのまま

参考サイト

ダークモード - Ionic Framework 日本語ドキュメンテーション

【Angular】Akita学習(2) - TODOアプリ作成

f:id:l08084:20201010181001p:plain

はじめに

前回の記事に引き続き、状態管理ライブラリのAkitaについて学習していきます。今回は、AkitaのEntityStoreを使用して、TODOアプリを作成します。

環境

  • Angular: 8.2.14
  • @datorama/akita: 5.2.4

$ ng versionの実行結果

Angular CLI: 8.3.29
Node: 12.13.1
OS: darwin x64
Angular: 8.2.14
... animations, common, compiler, compiler-cli, core, forms
... language-service, platform-browser, platform-browser-dynamic
... router

Package                           Version
-----------------------------------------------------------
@angular-devkit/architect         0.803.29
@angular-devkit/build-angular     0.803.29
@angular-devkit/build-optimizer   0.803.29
@angular-devkit/build-webpack     0.803.29
@angular-devkit/core              8.3.29
@angular-devkit/schematics        8.3.29
@angular/cli                      8.3.29
@ngtools/webpack                  8.3.29
@schematics/angular               8.3.29
@schematics/update                0.803.29
rxjs                              6.4.0
typescript                        3.5.3
webpack                           4.39.2

TODOアプリ作成

データベースのテーブルのようなデータ構造を持っているEntityStoreを使用して、TODOアプリを作成します。

EntityStoreには、通常のStoreと違ってselectAlladdremoveなどのメソッドが用意されています。

Model

まずは、Modelから作成していきます。Modelはデータベースでいうところのテーブルの構造にあたります。

todo.model.ts

import { ID } from '@datorama/akita';

export interface Todo {
  id: ID;
  title: string;
}

export function createTodo(params: Partial<Todo>) {
  return {} as Todo;
}

EntityStore

TODOの状態を保持するStoreです。今回はEntityStoreを採用しています。

todo.store.ts

import { Injectable } from '@angular/core';
import { EntityState, EntityStore, StoreConfig } from '@datorama/akita';
import { Todo } from './todo.model';

export interface TodoState extends EntityState<Todo> {}

@Injectable({ providedIn: 'root' })
@StoreConfig({ name: 'todo' })
export class TodoStore extends EntityStore<TodoState> {
  constructor() {
    super();
  }
}

Query

TODOの取得機能を提供しているQueryです。

todo.query.ts

import { Injectable } from '@angular/core';
import { QueryEntity } from '@datorama/akita';
import { TodoState, TodoStore } from './todo.store';

@Injectable({ providedIn: 'root' })
export class TodoQuery extends QueryEntity<TodoState> {
  constructor(protected store: TodoStore) {
    super(store);
  }
}

Service

addTodoメソッドとremoveTodoメソッドでTODOの追加と削除の機能を提供しています。

todo.service.ts

import { Injectable } from '@angular/core';
import { guid, ID } from '@datorama/akita';
import { TodoStore } from './todo.store';
@Injectable({ providedIn: 'root' })
export class TodoService {
  constructor(private store: TodoStore) {}

  /**
   * TODOを追加する
   *
   * @param {string} title
   * @memberof TodoService
   */
  addTodo(title: string) {
    this.store.add({
      id: guid(),
      title,
    });
  }

  /**
   * TODOを削除する
   *
   * @param {ID} id
   * @memberof TodoService
   */
  removeTodo(id: ID) {
    this.store.remove(id);
  }
}

Component

TODO画面のコンポーネントクラスです。QueryのselectAllメソッドでTODOの全量を取得し、Serviceを経由してTODOの追加と削除を行っています。

todo.component.ts

import { TodoState } from './state/todo.store';
import { Component, OnInit } from '@angular/core';
import { getEntityType, ID } from '@datorama/akita';
import { Observable } from 'rxjs';
import { TodoService } from './state/todo.service';
import { TodoQuery } from './state/todo.query';
import { FormBuilder, FormControl, FormGroup } from '@angular/forms';

@Component({
  selector: 'app-todo',
  templateUrl: './todo.component.html',
  styleUrls: ['./todo.component.scss'],
})
export class TodoComponent implements OnInit {
  readonly allTodo$: Observable<getEntityType<TodoState>[]>;
  todoFormGroup: FormGroup;
  titleControl: FormControl;

  constructor(
    private service: TodoService,
    private query: TodoQuery,
    private fb: FormBuilder
  ) {
    this.allTodo$ = this.query.selectAll();
    this.todoFormGroup = this.fb.group({
      title: ['', []],
    });
    this.titleControl = this.todoFormGroup.get('title') as FormControl;
  }

  ngOnInit() {}

  /**
   * TODOを追加する
   *
   * @memberof TodoComponent
   */
  addTodo() {
    this.service.addTodo(this.titleControl.value);
  }

  /**
   * TODOを削除する
   *
   * @param {ID} id
   * @memberof TodoComponent
   */
  removeTodo(id: ID) {
    this.service.removeTodo(id);
  }
}

todo.component.html

<div class="todo-area">
  <form [formGroup]="todoFormGroup">
    <mat-form-field>
      <input matInput placeholder="TODOタイトル" formControlName="title" />
    </mat-form-field>
  </form>
  <button (click)="addTodo()" mat-raised-button color="primary">
    Add TODO
  </button>
</div>
<ul>
  <li *ngFor="let todo of allTodo$ | async">
    {{ todo.title }}
    <button (click)="removeTodo(todo.id)" mat-button color="warn">Remove</button>
  </li>
</ul>

実際にTODOアプリを動作させる

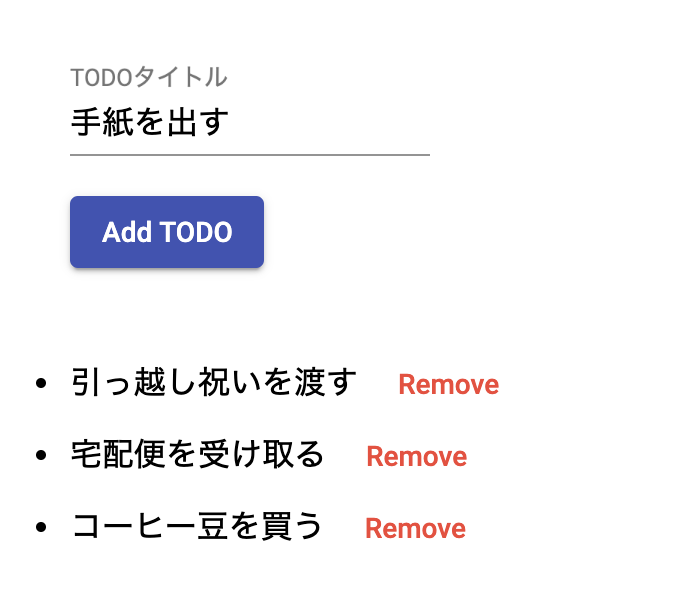
上記のコードを動作させると、下記のようなアプリになります。Add TODOボタンを押下するとTODOが追加され、Removeボタンを押下すると、TODOが削除されます。

f:id:l08084:20201010185612p:plain
TODOアプリ

参考サイト

リストレンダリング — Vue.js

TypeScript特有の組み込み型関数 - log.pocka.io

Akita | Reactive State Management

Netanel Basal – Datorama Engineering

Angular向け状態管理ライブラリAkitaの紹介 - Qiita

Angularのシンプルな状態管理ライブラリ Akita について - Qiita

Akita🐶でがんばる状態管理 - Qiita

素朴な Angular 向けの type safe で immutable な Flux Store - Qiita

【Angular】Akita学習(1) - カウンターアプリ作成

はじめに

仕事で状態管理ライブラリのAkitaを使うことになったので勉強のためにAngularとAkitaを使ってカウンターアプリを作ることにしました。

Akitaって?

f:id:l08084:20201005162817p:plain

Angular, React, Vueに対応している状態管理ライブラリになります。

f:id:l08084:20201006221324p:plain

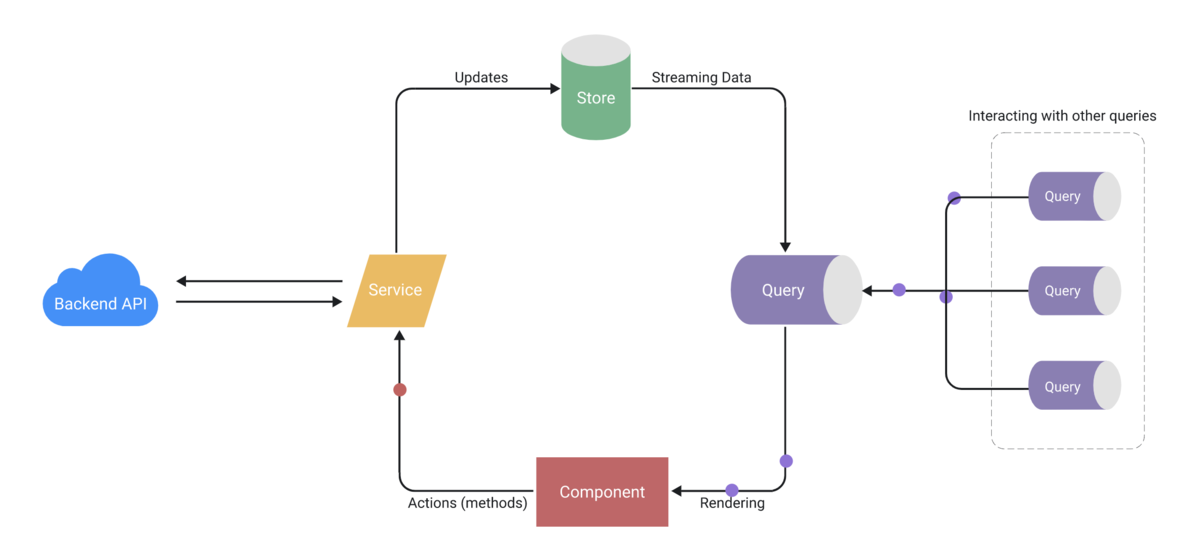
状態を保持するStore、現在の状態を取得するQuery、状態を更新したり、APIを呼び出したりするServiceという風に機能が分かれています。

環境

  • Angular: 8.2.14
  • @datorama/akita: 5.2.4

$ ng versionの実行結果

Angular CLI: 8.3.29
Node: 12.13.1
OS: darwin x64
Angular: 8.2.14
... animations, common, compiler, compiler-cli, core, forms
... language-service, platform-browser, platform-browser-dynamic
... router

Package                           Version
-----------------------------------------------------------
@angular-devkit/architect         0.803.29
@angular-devkit/build-angular     0.803.29
@angular-devkit/build-optimizer   0.803.29
@angular-devkit/build-webpack     0.803.29
@angular-devkit/core              8.3.29
@angular-devkit/schematics        8.3.29
@angular/cli                      8.3.29
@ngtools/webpack                  8.3.29
@schematics/angular               8.3.29
@schematics/update                0.803.29
rxjs                              6.4.0
typescript                        3.5.3
webpack                           4.39.2

Akitaインストール

まず、Angular CLIを使ってAngularプロジェクト(akita-counter)を作成します。

$ ng new akita-counter

続いて、Akitaライブラリをインストールします。

$ ng add @datorama/akita

Akita CLIもグローバルインストールします。

$ npm install @datorama/akita-cli -g

カウンターアプリ作成

値を一つずつ増やしたり減らしたりできるカウンターアプリを作成していきます。

Store

まず、カウンターの値を保持するStoreを作成します。

Akitaには通常のStoreとデータベースのテーブルのような取り扱いができるEntityStoreがありますが、今回の例では通常のStoreを使用しています。

counter.store.ts

import { Injectable } from '@angular/core';
import { Store, StoreConfig } from '@datorama/akita';

export interface CounterState {
  counter: number;
}

export function createInitialState(): CounterState {
  return {
    counter: 0,
  };
}
@Injectable({ providedIn: 'root' })
@StoreConfig({ name: 'counter' })
export class CounterStore extends Store<CounterState> {
  constructor() {
    super(createInitialState());
  }
}

Query

続いて、Storeから現在のカウンターの値を取得するQueryを作成します。

counter.query.ts

import { Injectable } from '@angular/core';
import { Query } from '@datorama/akita';
import { CounterState, CounterStore } from './counter.store';
@Injectable({ providedIn: 'root' })
export class CounterQuery extends Query<CounterState> {
  constructor(protected store: CounterStore) {
    super(store);
  }
}

Service

カウンターの値を更新する機能を持つServiceを作成します。加算を行うincrement()と減算を行うdecrement()を作成しました。

counter.service.ts

import { Injectable } from '@angular/core';
import { CounterStore } from './counter.store';
@Injectable({ providedIn: 'root' })
export class CounterService {
  constructor(private counterStore: CounterStore) {}

  increment() {
    this.counterStore.update((state) => ({
      counter: state.counter + 1,
    }));
  }

  decrement() {
    this.counterStore.update((state) => ({
      counter: state.counter - 1,
    }));
  }
}

increment()decrement()の内部ではStoreの値を更新するためにStoreのメソッドであるupdate()を呼び出しています。

Component

カウンター画面を作成します。QueryとServiceをDIすることで、カウントの取得と更新を行っています。

counter.component.ts

import { Component, OnInit } from '@angular/core';
import { CounterService } from './state/counter.service';
import { CounterQuery } from './state/counter.query';
import { Observable } from 'rxjs';

@Component({
  selector: 'app-counter',
  templateUrl: './counter.component.html',
  styleUrls: ['./counter.component.scss'],
})
export class CounterComponent implements OnInit {
  readonly counter$: Observable<number>;

  constructor(
    private counterService: CounterService,
    private counterQuery: CounterQuery
  ) {
    this.counter$ = this.counterQuery.select('counter');
  }

  ngOnInit() {}

  increment() {
    this.counterService.increment();
  }

  decrement() {
    this.counterService.decrement();
  }
}

Storeの値を取得するメソッドとして、Queryは2種類のメソッドを用意しています。select()getValue()です。select()ではStoreの値をObservable型で返します。getValue()はStoreの生の値を返します。

今回の例では、Storeの値の取得にselect()を使っています。

counter.component.html

<button (click)="increment()">Increment</button>
<button (click)="decrement()">Decrement</button>
{{ counter$ | async }}

上記のコードを実行すると、このようなカウンターアプリが表示されます。

f:id:l08084:20201006222153p:plain
カウンターアプリ

なお、AkitaはChromeのRedux Devtools Extensionで値の変遷を追うことができます。

f:id:l08084:20201007152716p:plain
AkitaにRedux Devtools Extentionを使っているところ

次回の記事

【Angular】Akita学習(2) - TODOアプリ作成 - 中安拓也のブログ

参考サイト

Akita | Reactive State Management

https://engineering.datorama.com/@NetanelBasal

Angular向け状態管理ライブラリAkitaの紹介 - Qiita

Angularのシンプルな状態管理ライブラリ Akita について - Qiita

Akita🐶でがんばる状態管理 - Qiita

素朴な Angular 向けの type safe で immutable な Flux Store - Qiita

Angular + Firebase でGoogle認証

f:id:l08084:20201004191022p:plain

はじめに

Ionic(Angular)のアプリでFirebase認証によるGoogle認証を実装します。

関連記事

メールアドレス/パスワード、Twitter、FacebookによるFirebase認証については過去に記事にしています。

  • メールアドレス/パスワードによる認証

AngularでFirebase認証(その1) Firebaseのセットアップ - 中安拓也のブログ

AngularでFirebase認証(その2) Angular Materialを使ったログイン画面の作成 - 中安拓也のブログ

AngularでFirebase認証(その3) Firebase Authentication の呼び出し - 中安拓也のブログ

Angular + Firebase でアカウント登録画面の作成 - 中安拓也のブログ

  • Twitter認証

Angular + Firebase でTwitter認証 - 中安拓也のブログ

  • Facebook認証

Angular + Firebase でFacebook認証 - 中安拓也のブログ

  • Firebase認証のリダイレクトモード

【Angular】リダイレクトモードでFirebase認証を行う - 中安拓也のブログ

環境

ハイブリットモバイルアプリ用フレームワークであるIonic(Angular)とFirebaseを使用してアプリを作成しています。

  • firebase@7.21.1

$ ionic infoコマンドの実行結果

$ ionic info

Ionic:

   Ionic CLI                     : 6.11.8 (/usr/local/lib/node_modules/@ionic/cli)
   Ionic Framework               : @ionic/angular 5.3.3
   @angular-devkit/build-angular : 0.1000.8
   @angular-devkit/schematics    : 10.0.8
   @angular/cli                  : 10.0.8
   @ionic/angular-toolkit        : 2.3.3

Capacitor:

   Capacitor CLI   : 2.4.1
   @capacitor/core : 2.4.1

Utility:

   cordova-res : not installed
   native-run  : not installed

System:

   NodeJS : v12.13.1 (/usr/local/bin/node)
   npm    : 5.6.0
   OS     : macOS Catalina

FirebaseコンソールでGoogle認証を有効にする

f:id:l08084:20201005221739p:plain
ログイン方法タブでGoogleを有効にする

  1. Firebaseコンソールで[Authentication]セクションを開きます。
  2. [ログイン方法]タブで[Google]を有効にし、[保存]をクリックします。

Googleのログインボタン作成

Step1: Googleのロゴアイコンを取得

まず、Icons8からGoogleのロゴアイコンをダウンロードします。

f:id:l08084:20201005215901p:plain
Googleのロゴ

Step2: GoogleカラーをIonicに追加

GoogleのログインボタンのカラーをIonicの配色に追加します。配色の追加方法については、下記の記事を参考にしてください。

【Ionic v5】Colorsに色を追加してボタンに適用する - 中安拓也のブログ

Step3: ログインボタンのテンプレートを作成

login.page.html

      <ion-button (click)="signInWithGoogle()" color="google" class="login-button google">
        <img class="g-icon" src="assets/icon/google-logo.png">Googleでログイン
      </ion-button>

login.page.scss

.login-button {
    font-weight: bold;
    margin-bottom: 18px;
    width: 100%;

    &.google {
        --border-style: solid;
        --border-width: 1px;
    }

    .g-icon {
        position: absolute;
        left: 15px;
        top: 25%;
        width: 1.4em;
    }
}

f:id:l08084:20201006125139p:plain
作成されたGoogleのログインボタン

Step4: リダイレクトモードでFirebase認証(Google)

モバイルデバイスによる認証を想定しているため、FirebaseのGoogle認証をリダイレクトモード(signInWithRedirect)で実装していきます。

下記のコードはFirebase認証を呼び出すサービスクラスです。ログイン画面から呼び出されます。

authentication.service.ts

export class AuthenticationService {
  constructor(public afAuth: AngularFireAuth) {}

  /**
   * Google認証を呼び出す。
   * 認証成功時にリダイレクトする。
   *
   * @returns {Promise<void>}
   * @memberof AuthenticationService
   */
  public signInWithGoogle(): Promise<void> {
    return this.afAuth.signInWithRedirect(
      new firebase.auth.GoogleAuthProvider()
    );
  }

  /**
   * リダイレクト後の処理。
   *
   * @returns {Promise<firebase.auth.UserCredential>}
   * @memberof AuthenticationService
   */
  public getRedirectResult(): Promise<firebase.auth.UserCredential> {
    return this.afAuth.getRedirectResult();
  }
}

下記のコードはログイン画面のコンポーネントクラスです。

login.page.ts

export class LoginPage implements OnInit {
  constructor(
    private authenticationService: AuthenticationService,
    private router: Router
  ) {}

  ngOnInit() {
    this.getRedirectResult();
  }

  /**
   * Googleで認証する。
   *
   * @memberof LoginPage
   */
  public async signInWithGoogle() {
    await this.authenticationService.signInWithGoogle();
  }

  /**
   * リダイレクト後に呼び出される処理。
   *
   * @private
   * @memberof LoginPage
   */
  private async getRedirectResult() {
    const result: firebase.auth.UserCredential = await this.authenticationService.getRedirectResult();
    try {
      if (result.user != null) {
        this.router.navigate(['/weight/tabs/tab1']);
      }
    } catch (error) {
      console.log(error);
    }
  }
}

上記のコードで行っているのは、下記の内容です。

  1. ユーザーがsignInWithGoogle()でログインします。
  2. Google でログインを行うため、signInWithRedirect()メソッドによってリダイレクトがトリガーされます。
  3. Googleログインをすると、ユーザーはログイン画面のコンポーネントに戻されます。
  4. ユーザーのログインは、ログイン画面のngOnInit()内のgetRedirectResult()で返される Promise によって解決されます。
  5. navigate()メソッドで、ルーターがユーザーを/weight/tabs/tab1に移動させます。

参考サイト

ログインにおけるブランドの取り扱いガイドライン  |  Google Identity Platform  |  Google Developers

【Ionic v5】[Shadow DOM]ボタンのレイアウトを変更する

f:id:l08084:20201004190825p:plain

はじめに

本記事では、Ionic v5のボタンのレイアウトを変更します。Ionic v5のボタン(ion-button)ではShadow DOMが適用されているため、Shadow DOMでないコンポーネントと同様のやり方でレイアウトを変更することができません。

ボタンのレイアウト変更を通して、Ionic v5のShadow DOMが適用されているコンポーネントのレイアウトの変更方法について説明します。

Shadow DOMって?

Shadow DOMとはDOMに対してカプセル化を提供する仕組みになります。

Shadow DOMによってカプセル化されたDOMは、特定の方法でしかその中身にアクセスできなくなります。

Ionic v5の例で言えば、Shadow DOM化されているボタン(ion-button)のレイアウトを変更するために、あらかじめ用意されたCSS変数経由でレイアウトを変更する必要があります。

Ionic v5では下記のコンポーネントがShadow DOM化されています。

  • ボタン
  • Card
  • Segment
  • Split Window

ボタンのレイアウトを変更する

続いて、Ionicのボタンのレイアウトを変更する具体的な方法について説明します。

今回は、例として下記のボタンに枠線を付けるレイアウト変更を実施します。

f:id:l08084:20201004193153p:plain
枠線がないボタンに枠線をつける

CSS変数の--border-style--border-widthを経由してボタンに枠線をつけていきます。

login.page.html

      <ion-button color="google" class="login-button google">
        <img class="g-icon" src="assets/icon/google-logo.png">Googleでログイン
      </ion-button>

login.page.scss

.login-button {
    font-weight: bold;
    margin-bottom: 18px;
    width: 100%;

    &.google {
        --border-style: solid;
        --border-width: 1px;
    }

    .g-icon {
        position: absolute;
        left: 15px;
        top: 25%;
        width: 1.4em;
    }
}

f:id:l08084:20201004200126p:plain
ボタンに枠線がついた

参考サイト

先取り、Shadow DOM - Shadow DOMが生まれた理由 | CodeGrid

(中級者向け)Ionic 4でのCSSカスタム変数の使い方 - Qiita

[翻訳]Ionic5がやってきた。Gifアニメーションつきで最新のWebモバイルUIフレームワークを紹介!|榊原昌彦|note

CSS変数 - Ionic Framework 日本語ドキュメンテーション

https://ionicframework.com/docs/api/button

【Angular】リダイレクトモードでFirebase認証を行う

f:id:l08084:20200930195042p:plain

はじめに

FirebaseのSNS認証には、ポップアップウィンドウを表示するポップアップモードとログインページにリダイレクトするリダイレクトモードの2種類の形式があります。

今回は、後者のリダイレクトモードの実装方法について説明します。

環境

ハイブリットモバイルアプリ用フレームワークであるIonic(Angular)とFirebaseを使用してアプリを作成しています。

  • firebase@7.21.1

$ ionic infoコマンドの実行結果

$ ionic info

Ionic:

   Ionic CLI                     : 6.11.8 (/usr/local/lib/node_modules/@ionic/cli)
   Ionic Framework               : @ionic/angular 5.3.3
   @angular-devkit/build-angular : 0.1000.8
   @angular-devkit/schematics    : 10.0.8
   @angular/cli                  : 10.0.8
   @ionic/angular-toolkit        : 2.3.3

Capacitor:

   Capacitor CLI   : 2.4.1
   @capacitor/core : 2.4.1

Utility:

   cordova-res : not installed
   native-run  : not installed

System:

   NodeJS : v12.13.1 (/usr/local/bin/node)
   npm    : 5.6.0
   OS     : macOS Catalina

リダイレクトモードでFirebase認証

FirebaseのTwitter認証をリダイレクトモードで実装していきます。なお、モバイルデバイスの認証ではポップアップモードではなくリダイレクトモードが推奨されています。

リダイレクトモードでは、signInWithRedirectを呼び出します。Twitter認証後(リダイレクト後)には、getRedirectResultが呼び出されます。

下記のコードはFirebase認証を呼び出すサービスクラスです。ログイン画面から呼び出されます。

authentication.service.ts

export class AuthenticationService {
  constructor(public afAuth: AngularFireAuth) {}

  /**
   * Twitter認証を呼び出す。
   * 認証成功時にリダイレクトする。
   *
   * @returns {Promise<void>}
   * @memberof AuthenticationService
   */
  public signInWithTwitter(): Promise<void> {
    return this.afAuth.signInWithRedirect(
      new firebase.auth.TwitterAuthProvider()
    );
  }

  /**
   * リダイレクト後の処理。
   *
   * @returns {Promise<firebase.auth.UserCredential>}
   * @memberof AuthenticationService
   */
  public getRedirectResult(): Promise<firebase.auth.UserCredential> {
    return this.afAuth.getRedirectResult();
  }
}

下記のコードはログイン画面のコンポーネントクラスです。

login.page.ts

export class LoginPage implements OnInit {
  constructor(
    private authenticationService: AuthenticationService,
    private router: Router
  ) {}

  ngOnInit() {
    this.getRedirectResult();
  }

  /**
   * Twitterで認証する。
   *
   * @memberof LoginPage
   */
  public async signInWithTwitter() {
    await this.authenticationService.signInWithTwitter();
  }

  /**
   * リダイレクト後に呼び出される処理。
   *
   * @private
   * @memberof LoginPage
   */
  private async getRedirectResult() {
    const result: firebase.auth.UserCredential = await this.authenticationService.getRedirectResult();
    try {
      if (result.user != null) {
        this.router.navigate(['/weight/tabs/tab1']);
      }
    } catch (error) {
      console.log(error);
    }
  }
}

上記のコードで行っているのは、下記の内容です。

  1. ユーザーがsignInWithTwitter()でログインします。
  2. Twitter でログインを行うため、signInWithRedirect()メソッドによってリダイレクトがトリガーされます。
  3. Twitterログインをすると、ユーザーはログイン画面のコンポーネントに戻されます。
  4. ユーザーのログインは、ログイン画面のngOnInit()内のgetRedirectResult()で返される Promise によって解決されます。
  5. navigate()メソッドで、ルーターがユーザーを/weight/tabs/tab1に移動させます。

ポップアップモードのFirebase認証

ポップアップモードによるFirebaseのTwitter認証は下記の記事を参照してください。

Angular + Firebase でTwitter認証 - 中安拓也のブログ

参考サイト

JavaScript で Google ログインを使用して認証する  |  Firebase

Google Developers Japan: Angular コンポーネントから Route 特有のコードを綺麗にする